Did you know that chocolate molds can transform ordinary melted chocolate into stunning hot chocolate bomb molds that sell for $4 to $8 each in stores?
These versatile tools are the secret behind perfectly shaped chocolate creations that impress friends and family. Chocolate molds come in various forms, with silicone chocolate molds offering easy release while polycarbonate chocolate molds provide that professional shine and finish. For instance, when making hot chocolate bomb molds, those hollow chocolate spheres filled with cocoa mix and marshmallows, the right mold makes all the difference. We’ve found that 2 to 2.5-inch-diameter molds work perfectly, creating bombs that dissolve beautifully when added to hot milk.
The type of chocolate matters as much as the mold. High-quality options like Callebaut or Lindt melt smoothly and deliver rich flavor, especially when properly tempered between 88-91°F for dark chocolate. Not a fan of tempering? Candy melts or compound chocolate offer a simpler alternative without sacrificing quality.
This comprehensive guide will walk you through everything from selecting the right chocolate molds for your projects to mastering professional chocolatiers’ techniques. Whether you’re looking to create custom chocolate bars, letter-shaped treats, or those wildly popular chocolate bombs, we’ve got you covered with step-by-step instructions and expert tips to ensure your homemade chocolate creations turn out perfectly every time.
Choosing the Right Chocolate Mold for Your Recipe
Selecting the perfect chocolate mold transforms your recipe from ordinary to extraordinary. The right mold not only shapes your chocolate but also affects its appearance, texture, and ease of creation. Let’s explore how to match your chocolate dreams with the ideal mold.
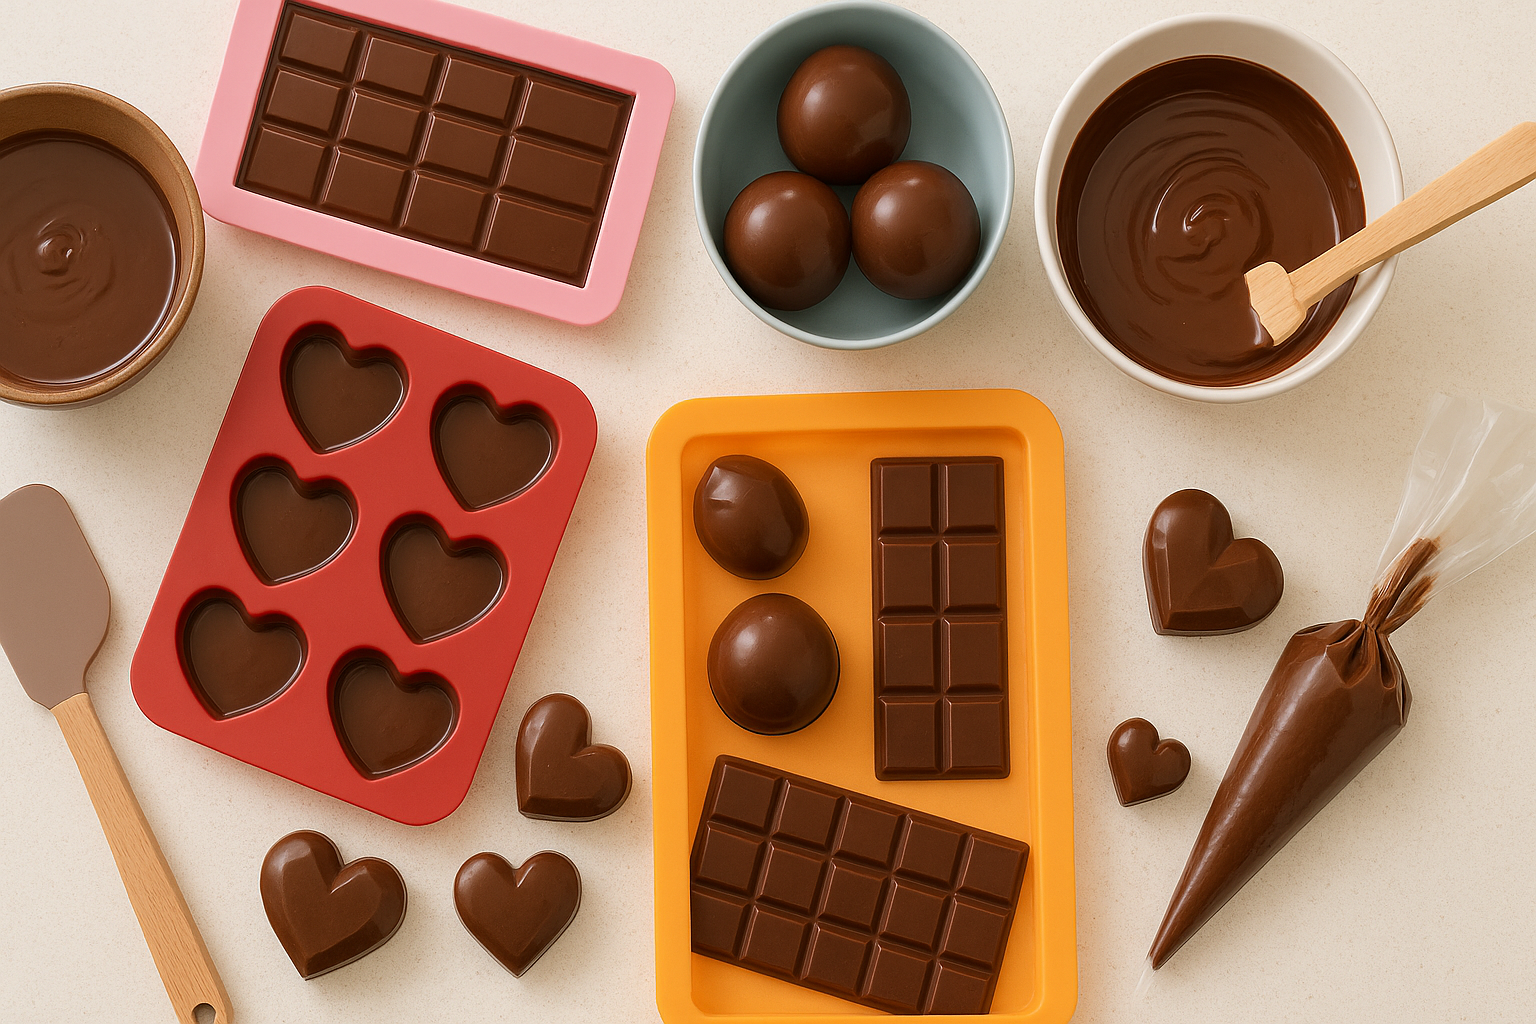
1. Chocolate bar mold vs. chocolate candy molds
Chocolate bar molds create larger, sectioned treats that separate into individual pieces. A typical bar mold produces chocolates measuring approximately 5½” × 2¼” × ¼”. These molds generally contain 3 cavities per tray, allowing you to make multiple bars simultaneously. One pound of chocolate makes roughly 8 complete bars.
In contrast, chocolate candy molds feature multiple smaller cavities, typically 15-18 per tray, ideal for creating bite-sized treats. These molds come in countless shapes, from simple rounds to intricate designs, perfect for holidays or themed events.
2. When to use chocolate bomb molds
Hot chocolate bomb molds require specific spherical molds that create hollow shells capable of holding cocoa mix and marshmallows. These typically come in two primary sizes: 2″ diameter shells (requiring 16g of chocolate per half) and 2.5″ diameter shells (needing 25g per half).
Consider your mug size when selecting bomb molds. Standard 8 oz mugs have approximately 2.5″ wide openings, so bombs should be slightly smaller to fit comfortably. Ensure your mold has enough interior space for the cocoa mix and marshmallows.
Three-part molds offer the highest precision for chocolate bombs. These innovative molds use separate bottom, liner, and top pieces, creating perfectly even shells with flat edges. Their design ensures consistent thickness throughout the sphere, though they require specific assembly techniques.
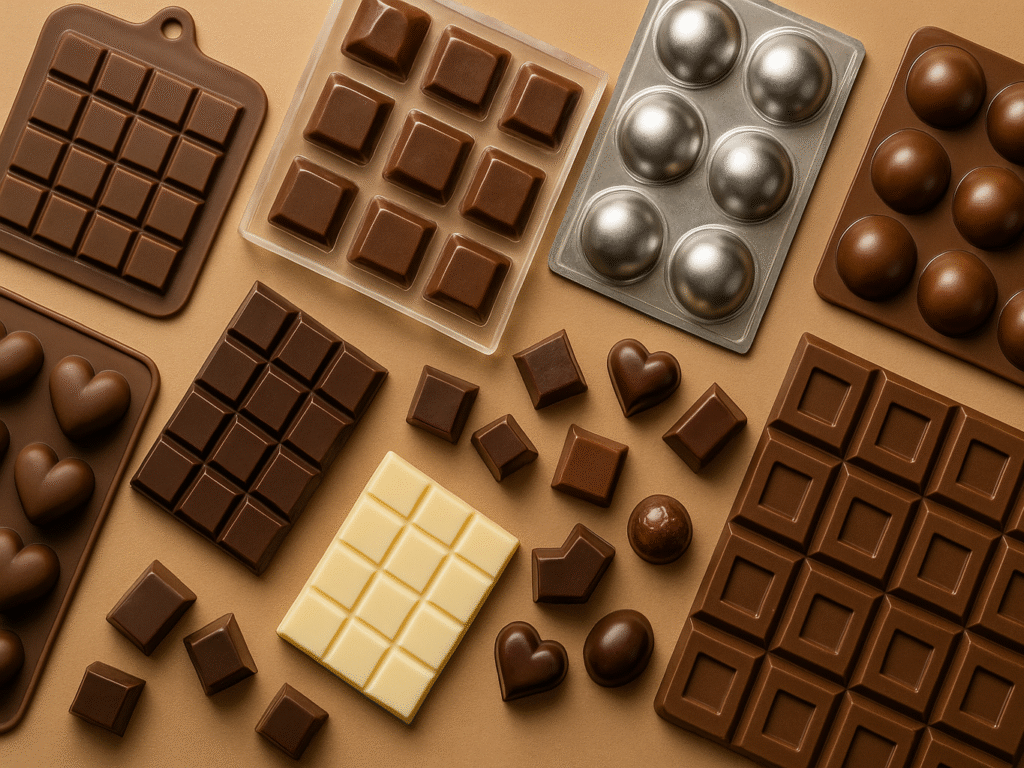
3. Silicone vs. polycarbonate chocolate molds
Silicone molds have revolutionized home chocolate making with their flexibility and non-stick properties. These soft, pliable molds allow easy removal of finished chocolates without breaking. Furthermore, they’re dishwasher safe and versatile enough for oven, microwave, and freezer use.
However, polycarbonate molds remain the professional chocolatier’s choice. These rigid, clear molds produce chocolates with exceptional gloss and smooth surfaces. Tempered chocolate contracts slightly as it sets, making removal from polycarbonate particularly clean.
The choice between these materials often depends on your experience level:
- Silicone benefits: Easier for beginners, flexible for removal, non-stick surface
- Silicone limitations: Less glossy finish, potential for staining, slower cooling time
- Polycarbonate benefits: Superior gloss, professional results, better detail reproduction
- Polycarbonate limitations: Less forgiving, requires proper tempering, higher price point
4. Custom molded chocolate: When to go personalized
Custom molded chocolate elevates your creations by incorporating personal touches, logos, messages, or distinctive shapes. These personalized molds particularly shine for special occasions like birthdays, where chocolate molds letters can spell ages or names.
Custom silicone molds typically range from $39-$52, allowing you to create king-sized chocolate bars with your design. These molds produce bars measuring approximately 6.7″ × 2.9″ × 0.4″, holding about 4.3 fluid ounces of chocolate.
Before investing in custom-molded chocolates, consider the material and the manufacturing processes. Injection-molded polycarbonate produces finer details and works better for automated production, albeit at higher costs. Thermoformed molds offer more flexibility and affordability, making them suitable for hand-filling.
Whatever chocolate mold you choose, ensure it aligns with your recipe requirements, skill level, and intended presentation for the best possible results.
Step-by-Step: How to Use Chocolate Molds
Creating professional-looking chocolates at home is easier. With the right techniques, even beginners can achieve impressive results. Let’s dive into the step-by-step process for turning simple ingredients into chocolate masterpieces.
1. Melting the chocolate (with or without tempering)
Firstly, choose your melting method based on your comfort level and available equipment. For beginners, the microwave offers simplicity:
- Break the chocolate into small (½ inch) pieces for even melting
- Place in a microwave-safe bowl and heat at 50% power for 30-second intervals
- Stir thoroughly between each interval until smooth
Alternatively, use a double boiler by placing the chocolate in the top section over hot (not boiling) water. This method provides more control and reduces the risk of burning.
For tempered chocolate (which creates that professional snap and shine):
- Heat chocolate to 115°F for dark or 110°F for milk/white
- Cool to 81°F by adding unmelted chocolate pieces
- Reheat gently to 88-90°F for dark or 86-88°F for milk/white
Proper temperature control is crucial; chocolate burns easily at temperatures above 115°F. Always use completely dry equipment, as even a single drop of water can cause chocolate to seize.
2. Pouring and tapping to remove bubbles
Once melted, pour the chocolate into molds immediately. For consistent results:
- Use a scale to measure equal amounts for each cavity
- Consider squeeze bottles or pastry bags for precise pouring
- Fill each cavity, but avoid overfilling
The most critical step comes next, removing air bubbles. Tap the mold firmly against your work surface several times. This vibration temporarily lowers chocolate’s viscosity, allowing air bubbles to rise. Tap more vigorously for stubborn bubbles in detailed molds, or consider a small rubber hammer for better vibration.
3. Cooling, unmolding, and finishing touches
Proper cooling ensures perfect chocolates. For optimal results:
- Cool at room temperature (59°F-64°F) for standard chocolates
- Avoid refrigeration unless working with thick chocolates or stacked molds
- If refrigerating, limit time to 15-20 minutes to prevent condensation
Your chocolate is ready when it appears cloudy from the bottom and shows signs of pulling away from the mold. To unmold:
- Turn the mold upside down over a clean towel
- Tap gently against a flat surface
- If chocolate resists, place it in the freezer for 5-10 minutes
- For silicone molds, gently flex to release the chocolate
For hollow shapes like bombs, pour chocolate into the mold, then flip it upside down to pour out excess, leaving just a thin shell.
3. Decorating molded chocolate
Elevate your creations with decorative techniques:
- Pre-decoration: Paint colored cocoa butter into mold cavities before adding chocolate
- Layer method: Apply one color, let it harden for a minute, then add another color
- Post-decoration: Pipe details with melted candy in contrasting colors after unmolding
- Dry brushing: Apply luster or shimmer dust for metallic effects
For filled chocolates, fill shells to three-quarters with your desired filling, then seal with additional tempered chocolate. Tap again to ensure no air bubbles remain.
Remember to clean your molds immediately while the chocolate is still melted. It prevents residue from affecting future batches and ensures your molds remain perfect for your next chocolate-making adventure.
Chocolate Mold Mistakes to Avoid (And How to Fix Them)
Even the most promising chocolate creation can be ruined by simple mistakes. After learning how to select and use chocolate molds, understanding what can go wrong, and how to fix it, will save you frustration and ingredients. Let’s explore the most common pitfalls and their solutions.
1. Overheating or under-tempering chocolate
Chocolate is remarkably sensitive to temperature. Dark chocolate should never exceed 120°F, while milk and white chocolate have even lower thresholds of 110°F and 105°F, respectively. Exceeding these temperatures causes the chocolate to become:
- Thick and muddy with lost sheen
- Lumpy or grainy in texture
- Overly thick and difficult to pour
If you’ve overheated your chocolate, don’t panic. First, remove it from the heat source and transfer it to a cool, dry bowl. Then add a handful of solid chocolate chunks while stirring constantly. It quickly lowers the temperature. For persistent thickness, try adding a teaspoon of neutral vegetable oil (like grapeseed or sunflower) per 150g of chocolate or strain through a fine sieve.
Under-tempering is equally problematic, resulting in dull, soft chocolate that won’t release properly from molds.
2. Using the wrong mold for the chocolate type
Not all molds work equally well with all chocolate varieties. For instance, intricate designs in polycarbonate molds require properly tempered chocolate to capture details and release cleanly. Alternatively, untempered or compound chocolate works better with flexible silicone molds.
Temperature matching between the mould and the chocolate is crucial. Your molds should be at room temperature or slightly cooler than your tempered chocolate, but never more than 5°F cooler, as this causes the cocoa butter to set too quickly in an untempered state.
3. Not prepping the mold properly.
Proper mold preparation is essential for success. Common preparation mistakes include:
- Using wet molds (moisture is chocolate’s enemy)
- Leaving fingerprints or residue from previous uses
- Failing to polish polycarbonate molds
- Using detergents that leave residue
After washing with mild soap and warm (not hot) water, thoroughly dry your molds and polish with a cotton ball or microfiber cloth to create a shiny finish. Never put chocolate molds in the dishwasher, as high heat will warp them.
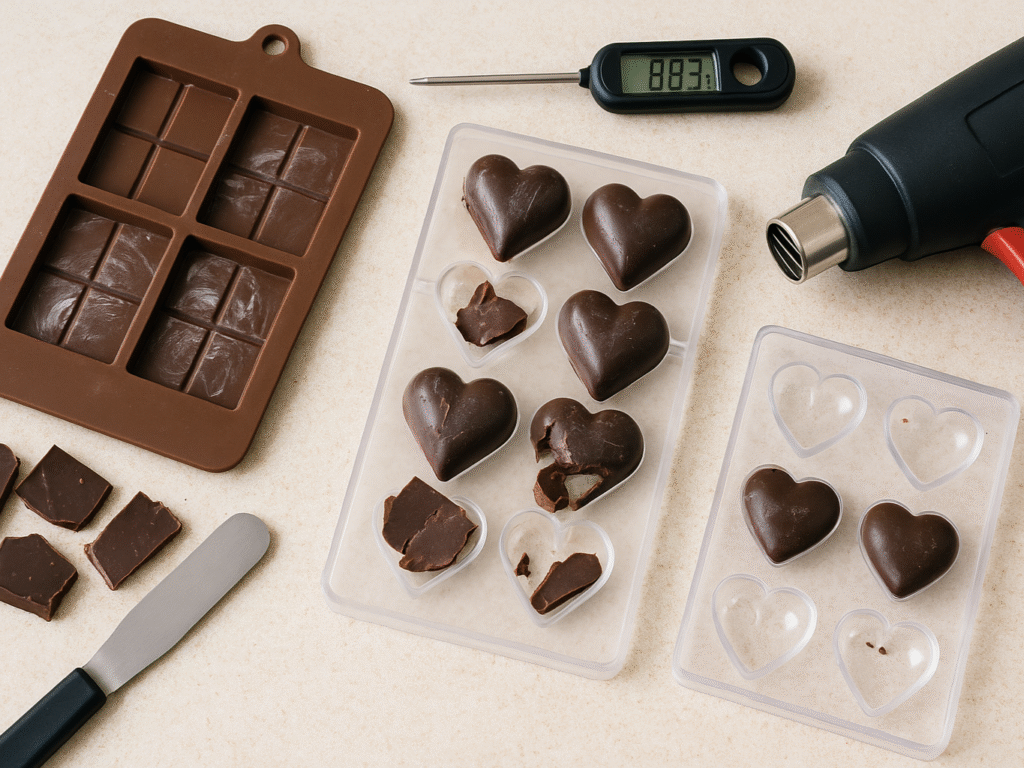
4. How to fix a cracked or stuck chocolate
Cracks typically occur when cooling is too abrupt. Instead of placing freshly filled molds directly in the refrigerator, let them set at room temperature first, partially. For thick creations, cooling should be gradual to prevent thermal shock.
When chocolates stick to molds, try these solutions:
- Place the mold in the freezer for 5-10 minutes. The chocolate contracts when cold
- Gently tap the mold upside down against a clean towel
- For silicone molds, carefully flex to release the chocolate
- For polycarbonate molds, warm slightly with your fingertips
Prevention is always better than a cure; properly tempered chocolate will naturally shrink slightly as it sets, making unmolding significantly easier.
Top 5 Chocolate Molds to Buy in 2025
With the right techniques in your toolkit, investing in quality molds becomes your next priority. I’ve tested dozens of options to bring you my top picks for 2025 that balance quality, functionality, and value.
1. FineGood Chocolate Bar Mold with 100 Gold Foil Wraps ($ 23.67)
The FineGood Chocolate Bar Mold set includes four non-stick silicone molds and 100 gold foil wraps, perfect for crafting professional-looking chocolate bars at home. Designed for flexibility and durability, these molds withstand temperatures from -40°C to 230°C, making them suitable for ovens, microwaves, dishwashers, and freezers. Ideal for gifting, parties, or personal treats.
Key Features
- Complete Set: Includes 4 silicone molds and 100 gold foil wraps for a comprehensive chocolate-making experience.
- Temperature Resistant: Safe for use between -40°C and 230°C, suitable for various kitchen appliances.
- Flexible & Durable: Made from high-quality silicone that doesn’t deform under heat and ensures easy demolding.
- Versatile Use: Perfect for creating chocolate bars for birthdays, holidays, or as personalized gifts.
Pros
- Comprehensive set with molds and wraps included.
- High-quality, food-grade silicone ensures safety and durability.
- Easy to clean and dishwasher safe.
- Suitable for a wide range of temperatures and appliances.
Cons
- Limited to one mold design, which may not cater to all preferences.
- The size may be smaller than expected for some users.
Customer Feedback
Customers appreciate the ease of use and the professional finish that the molds provide. Including gold foil wraps adds a touch of elegance, making homemade chocolates suitable for gifting. Some users noted the molds are slightly smaller than anticipated, but still effective for personal use.
2. BAKER DEPOT Semicircle Silicone Chocolate Mold ($9.99)
This silicone semicircle chocolate mold by BAKER DEPOT features 6 cavities for creating perfect dome-shaped treats. Made from food-grade silicone, it’s ideal for chocolates, candies, mousses, and other desserts. The flexible design allows for easy release of finished creations.
Key Features
- Food-grade silicone material ensures safety for all your baking and confectionery needs
- Temperature resistant from -40°F to 446°F for versatile use in freezer, oven, or microwave
- Non-stick surface provides easy release of chocolates, and clean-up is a breeze
- Flexible design allows for perfect domed treats with professional-looking results every time
Pros:
- Durable, high-quality silicone construction
- Versatile for multiple dessert applications
- Easy to clean and dishwasher safe
- Creates professional-looking domed treats
Cons:
- Limited to six cavities per mold
- Some users report slight difficulty with the initial release
- May require stabilization on a baking sheet
- Shapes are larger than some users expected
Customer Feedback
Most customers praise the mold’s durability and ease of use, particularly for creating perfect dome-shaped chocolates and desserts. Several reviews mention successful results with mousses and ganache fillings. A few customers noted the need to freeze chocolate longer for easier removal, but overall satisfaction is high.
3. Wilton Silicone Letters and Numbers Fondant Mold ($16.99)
The Wilton Silicone Letters and Numbers Fondant Mold is a versatile baking accessory for personalized treats. This flexible silicone mold features the alphabet and numbers 0-9, allowing bakers to craft custom messages for cakes, cupcakes, and other confections with professional-looking results.
Key Features
- Complete alphabet and numbers 0-9 in one convenient mold for creating personalized decorations
- Food-grade silicone construction ensures safe use and easy release of fondant shapes
- Flexible design allows for the simple removal of delicate letters without tearing or distortion
- Compatible with various edible materials, including fondant, gum paste, chocolate, and candy melts
Pros:
- Creates professional-looking letter decorations
- Versatile for multiple materials beyond just fondant
- Durable silicone construction for long-lasting use
- Easy to clean and dishwasher safe
Cons:
- Letters are on the smaller side for large cake decorations
- Some detailed letters may require careful handling when removing
- Letters have varying heights, which may affect the uniform appearance
- May require practice to master the right thickness of material
Customer Feedback
Most reviewers appreciate how the mold creates professional-looking cake decorations easily. Many customers mention success with chocolate as well as fondant. Some users note that thinner fondant works better for clean removal, while a few mention that the letters are smaller than expected. Overall, customers find it a valuable tool for personalizing special occasion desserts.
4. Palksky 2-Pack Silicone Basketball Chocolate Molds ($ 16.99)
The Palksky Silicone Basketball Chocolate Molds are a set of two high-quality food-grade silicone molds designed to create realistic basketball-shaped treats. Each mold features six cavities with detailed basketball patterns, perfect for sports-themed parties, events, or as gifts for basketball enthusiasts.
Key Features
- Food-grade silicone material ensures safe, non-toxic use for all your chocolate and candy-making needs
- Heat resistant from -40°F to 446°F for versatile use in freezer, refrigerator, oven, and microwave
- Detailed basketball texture design creates professional-looking sports-themed treats with an authentic appearance
- Flexible construction allows for easy release of chocolates without damage to the intricate details
Pros:
- Creates realistic 3D basketball shapes with detailed textures
- Versatile for multiple applications, including chocolates, candies, and cake decorations
- Durable, reusable design for long-term use
- Easy to clean and dishwasher safe
Cons:
- Limited to basketball designs only
- May require practice to achieve perfect results
- Some users report needing to tap molds to release air bubbles
- Slightly smaller cavity size than some users expected
Customer Feedback
Customers praise these molds for their durability and the professional results they achieve. Many reviewers mention successful use for basketball-themed parties and events. Several users note that the chocolates release easily when properly chilled. A few customers suggest spraying with cooking oil before first use for best results. The molds are highly rated for their quality and detailed basketball design.
5. QEEYON Silicone Love Letter Alphabet Chocolate Mold ($7.99)
The QEEYON Silicone Love Letter Alphabet Chocolate Mold features the word “LOVE” in an elegant font, perfect for creating romantic treats and decorations. This food-grade silicone mold is designed for making chocolates, candies, fondant letters, and other edible crafts for Valentine’s Day, anniversaries, weddings, and other special occasions.
Key Features
- Made from high-quality food-grade silicone that’s non-toxic, odorless, and safe for creating edible decorations
- Temperature resistant from -40°F to 446°F for versatile use in freezer, refrigerator, and microwave
- Non-stick surface ensures easy release of chocolates and candies with detailed letter impressions intact
- Perfect size for cake toppers, cupcake decorations, or standalone chocolate gifts for romantic occasions
Pros:
- Creates elegant “LOVE” letters with professional-looking results
- Versatile for multiple edible materials, including chocolate, candy, fondant, and more
- Flexible design allows for easy removal without breaking delicate letters
- Dishwasher safe for convenient cleaning
Cons:
- Limited to only spelling “LOVE” rather than custom messages
- Some users may need practice to achieve clean edges
- Requires careful filling to capture all letter details
- May need greasing before first use for optimal results
Customer Feedback
Customers appreciate how easy the mold is to use and clean. Many reviewers mention successful results with both chocolate and candy melts. Several users highlight the mold’s durability and reusability. Some customers suggest tapping the filled mold on the counter to remove air bubbles for best results. Overall, reviewers find it perfect for creating special romantic treats and decorations.
Fun Ways to Use Chocolate Molds (Beyond Just Candy)
The versatility of chocolate molds extends well beyond making simple candies. Let’s explore creative ways to use these tools for celebrations, gifts, and special occasions.
1. Molded chocolate for party favors or weddings
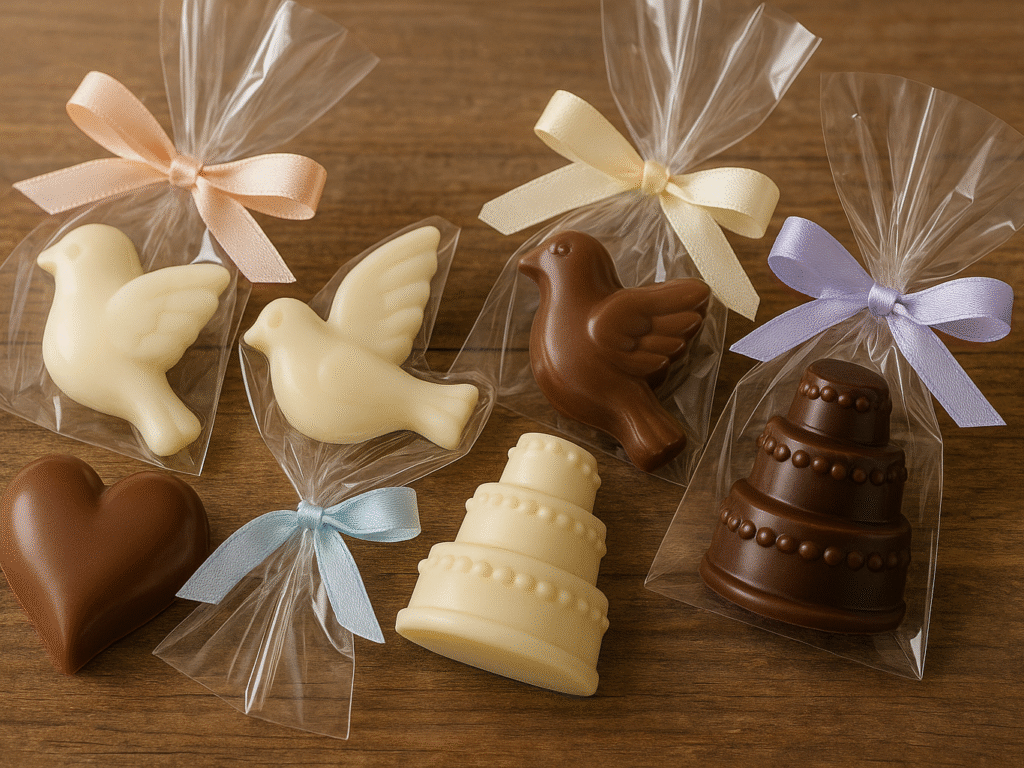
Chocolate party favors add a personal touch to special events, such as kids’ parties, and themed molded milk chocolates create memorable take-home treats. Wedding favors featuring chocolate hearts, doves, or miniature cakes offer guests an elegant memento. Custom-designed wedding-themed chocolates showcase the couple’s personality while adding a unique touch to the celebration.
For truly personalized events, consider custom chocolates made from your artwork. The process typically involves creating a custom mold from your design, then filling it with quality chocolate before packaging as desired, whether in cellophane wraps, colored foil, or decorative boxes.
2. Edible cake toppers
Transform any homemade cake with chocolate decorations that double as delicious treats. White chocolate wafers make excellent edible cake toppers when piped into numbers, letters, or simple designs. These eye-catching decorations instantly elevate homemade birthday cakes and cupcakes.
To create your edible toppers, melt white chocolate wafers, transfer to a piping bag, and pipe your design onto waxed paper. While still wet, add sprinkles for extra flair. After cooling, these decorations can be positioned atop cakes using wooden skewers.
3. DIY chocolate gifts with letter molds
Letter-shaped chocolates offer endless possibilities for personalized gifts. Spell out names, ages, or meaningful messages like “love” or “xo”. These customized treats make thoughtful additions to cakes, cupcakes, or standalone gifts.
You can create chocolate letter molds using silicone putty and ordinary fridge magnets. The process is surprisingly simple: mix equal parts of the two-component putty, press your letter into it, wait for it to set, then fill with melted chocolate.
4. Chocolate-covered nuts or fruit in molds
Elevate simple dried fruits and nuts by combining them with quality chocolate in decorative molds. These fruit and nut clusters require minimal effort yet create impressive results. Mix dried cranberries, pumpkin seeds, sunflower seeds, and sliced almonds with melted dark chocolate, then scoop into mounds on waxed paper.
For added visual appeal, reserve some fruit and nut pieces to press onto the tops of your clusters while the chocolate is still wet. Once set, these jewel-like treats store well in airtight containers for several weeks.
Conclusion
Making professional-quality chocolates at home has become remarkably accessible, with various mold types transforming simple melted chocolate into impressive creations. Silicone molds offer flexibility and ease for beginners, while polycarbonate delivers professional shine for experienced chocolatiers. Proper temperature control remains crucial regardless of your chocolate quality, and techniques like gentle tapping to remove bubbles ensure flawless results.
The creative possibilities with chocolate molds extend far beyond basic candies. From custom mold letters for celebrations to elegant wedding favors, edible cake toppers, and seasonal treats, these versatile tools inspire countless applications. Even complex creations like hot chocolate bomb molds, retailing for $4-$8 each, become attainable with the right techniques and quality molds.
The greatest joy of chocolate mold crafting is its accessibility and rewarding nature. Anyone can create impressive treats that look store-bought but taste infinitely better, making them perfect for personal enjoyment or thoughtful gifts. While the techniques may require practice, the satisfaction of creating handmade chocolate delights is unmatched. With quality molds, good chocolate, and patience, you’ll soon master the art of creating chocolate masterpieces.