
The Best Rice Cooker for Fluffy Rice: The Only Guide You’ll Ever Need

A bowl of freshly steamed, fluffy white rice with a wooden rice paddle resting on the side, steam rising from the grains.

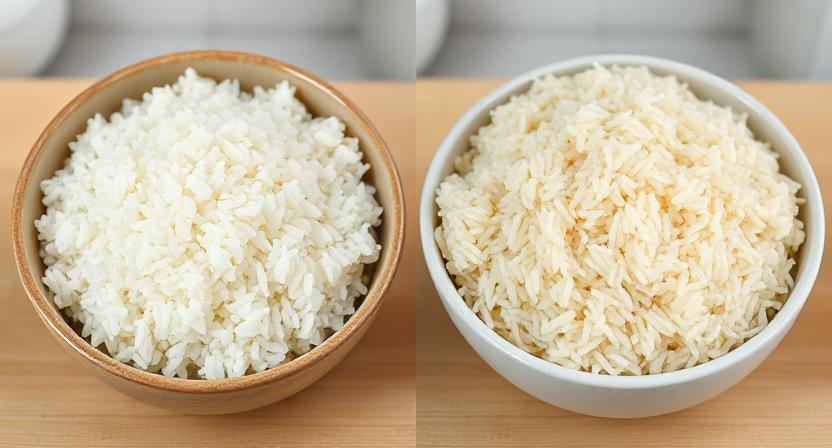
Let’s be honest. Cooking rice can be frustrating. One day it turns out mushy, the next day it’s too dry. And don’t even get me started on that burnt layer at the bottom of the pot. Sound familiar?

You’re not alone. Most people struggle to make rice just right. But what if I told you there’s a way to make it perfect, every single time? No guesswork. No stress. Just fluffy, soft, and delicious rice.

The secret? The best rice cooker for fluffy rice. Yep, that’s all you need. A good rice cooker does the thinking for you. Add rice, add water, and press a button. Done. Sounds good, right?

Let’s talk about how you can cook rice like a pro, what mistakes to avoid, and which rice cooker fits your budget. Ready? Let’s go.

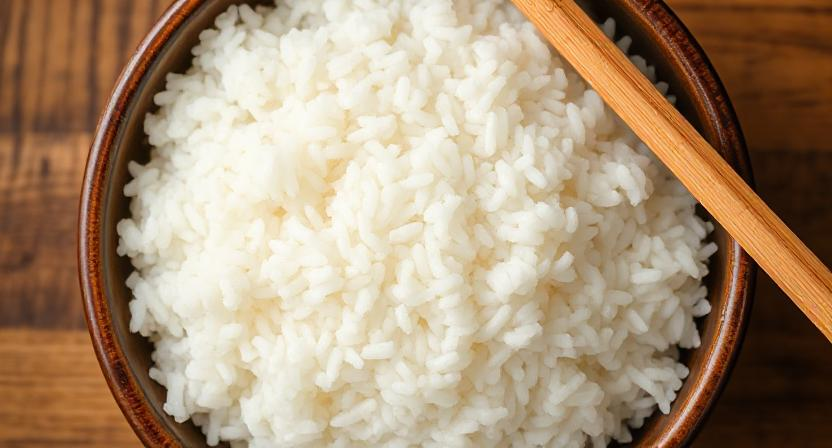
Why Fluffy Rice Matters (And Why It’s So Hard to Get Right)

Side-by-side comparison of two bowls of rice: one with fluffy, separate grains and the other with mushy, clumpy rice.

Fluffy rice makes any meal better. Have you ever had a plate of curry with badly cooked rice? It ruins the whole experience. Sushi with clumpy rice? Disaster. Even a simple stir-fry tastes off if the rice is too hard or too soft.

But here’s the problem. Cooking rice is tricky. It absorbs water differently depending on the type. It needs the right amount of steam, and it hates being disturbed. Too much water? Mushy mess. Too little? Crunchy disaster.

That’s why you need the best rice cooker for fluffy rice. It takes care of everything. You don’t have to keep checking. No more lifting the lid to “see if it’s done” (which, by the way ruins it). Just press the button and walk away.

Liam, My Rice-Challenged Neighbor

Liam was my neighbor. Good guy. Terrible at cooking rice.  Every night, I’d smell burnt rice from his apartment. It was tragic. One evening, I found him staring at a pot of ruined rice, looking defeated.  

“Rice is supposed to be easy!” he groaned.  “It is. Just not for you,” I shot back.  

Frustrated, he searched “best rice cooker for fluffy rice” and ordered the best budget rice cooker, Aroma Housewares 6-Cup. “If this doesn’t work, I’m done with rice forever.”  

When it arrived, he followed the steps, pressed the button, and waited. Twenty minutes later, boom. Perfectly fluffy rice.  

I took a bite. Damn. It was actually good.  “Told you I could cook,” he smirked.  

Sure, Liam. It was definitely you.

How to Cook Perfect Rice: The Step-by-Step Guide

Hands rinsing white rice in a fine-mesh strainer under running water in a kitchen sink.

Before we talk about rice cookers, let’s break down the right way to cook rice. Even with the best machine, a few key steps will make a difference.

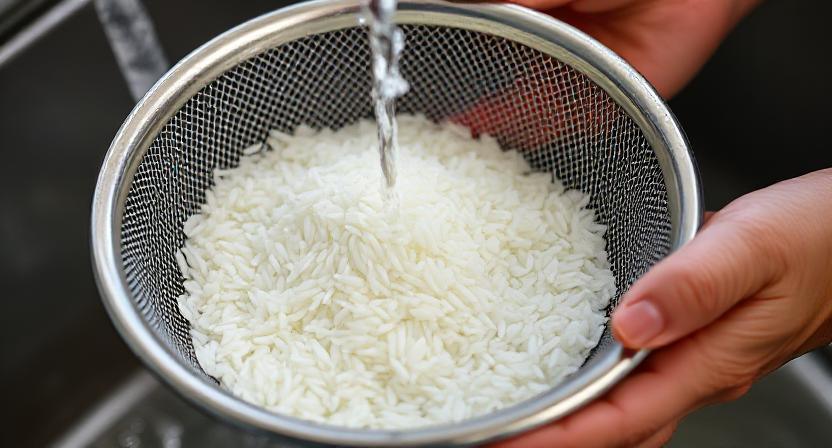
Step 1: Always Rinse Your Rice

I know, I know. Some people say rinsing isn’t necessary. But trust me, it is. Rinsing removes excess starch, which makes rice sticky and clumpy. Just put it in a strainer, run cold water over it, and swish it around. Do this until the water runs clear.

If you want a tool for this, the Good Cook Rice Measuring Cup & Strainer Set is a lifesaver. It’s cheap and does the job well.

Step 2: Use the Right Water Ratio

Different rice needs different amounts of water. The usual rule is:

(i) White rice: 1 cup rice = 1.5 cups water

(ii) Brown rice: 1 cup rice = 2 cups water

(iii) Jasmine/Basmati: 1 cup rice = 1.25 cups water

With a rice cooker, you don’t need to think about this too much. Just use the measuring cup that comes with it.

Step 3: Let the Rice Rest

The biggest mistake? Scooping out rice the second it’s done. Don’t do that. Let it sit with the lid on for 10 minutes. This helps distribute the moisture evenly.

Step 4: Fluff It Up

Once rested, grab a fork or a rice paddle and gently fluff the rice. No mashing. Just separate the grains lightly. And there you have it. Perfect rice.

Choosing The Best Rice Cooker for Fluffy Rice

Three different rice cookers—budget, mid-range, and premium—lined up on a modern kitchen countertop.

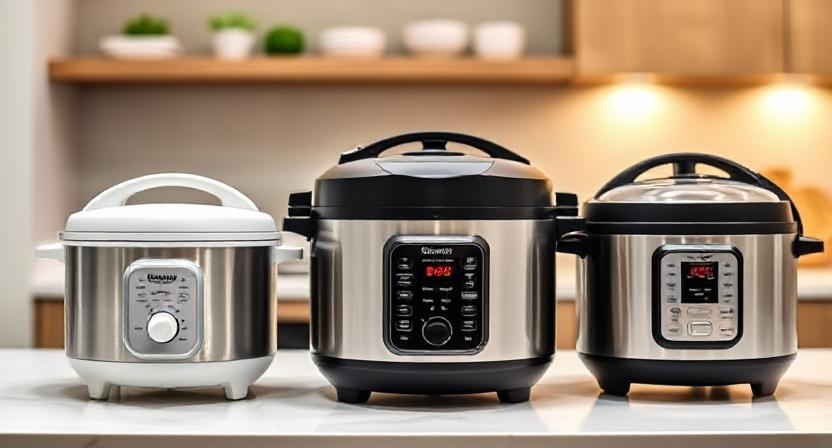
Now, let’s talk about rice cookers. Not all are the same. Some are basic, some are fancy. But which one is best for you? Let’s break it down.

(a) Budget Pick: Good Cook Rice Measuring Cup & Strainer Set (~$5–$8)

Okay, this isn’t a rice cooker. But if you’re on a tight budget and cooking on the stove, this helps a lot. It ensures you measure properly and rinse well, two key things for fluffy rice.

  • Pros: Super cheap, easy to use, perfect for stovetop cooking.
  • Cons: Still requires you to watch over your rice.
  • Best for: Beginners or those who don’t want to invest in a cooker just yet.

(b) Best Budget Rice Cooker: Aroma Housewares 6-Cup Rice Cooker (~ $20-$22)

This is hands down the best budget rice cooker. Why? Because it’s simple, affordable, and works well. Just add rice, add water, and press a button. That’s it.

  • Pros: Automatic cooking, keep-warm function, easy cleanup.
  • Cons: No fancy features, but it gets the job done.
  • Best for: Anyone who wants an easy, no-fuss way to cook rice.

(c) Premium Pick: Zojirushi Neuro Fuzzy Rice Cooker (~$150–$180)

This one is next-level. If you want the best rice cooker for fluffy rice, this is it. It has “fuzzy logic” technology, meaning it literally adjusts the cooking process for perfect results every time.

  • Pros: Precise cooking, perfect texture, keeps rice warm for hours.
  • Cons: Expensive, but worth it if you eat rice daily.
  • Best for: Serious rice lovers who want perfection every time.

Why a Rice Cooker is Worth It

Still thinking about cooking rice in a regular pot? Here’s why a rice cooker is better:

  • No Guesswork: Water-to-rice ratio is always right.
  • Consistent Results: No more undercooked or overcooked rice.
  • Hands-Free Cooking: Set it and forget it.

More Than Rice: Some models can make quinoa, oatmeal, and even soup.

Extra Tips for Perfect Rice

  1. Try Different Grains: Most rice cookers can handle quinoa, barley, or even couscous.
  2. Use Broth Instead of Water: Adds extra flavor.
  3. Never Open the Lid Mid-Cooking: This ruins the steam process.
  4. Clean Your Rice Cooker Regularly: It lasts longer and works better.

Final Thoughts: Which One Should You Get?

Alright, decision time. If you’re on a budget and cooking on the stove, grab the Good Cook Rice Measuring Cup & Strainer Set. If you want an actual cooker without spending too much, the Aroma Housewares 6-Cup Rice Cooker is the best budget rice cooker. And if you want perfection, the Zojirushi Neuro Fuzzy is the way to go.

One thing’s for sure, no matter which one you choose, you’re about to have much better rice. And that’s a win.

What’s your pick? Budget, mid-range, or premium? Let me know!

our pick? Budget, mid-range, or premium? Let me know!

The Best Food Storage Containers for Fridge: Reduce Waste (and Save You Money!)

A well-organized fridge filled with neatly stacked food storage containers, labeled and arranged for easy access.

Ever pulled out a jar from your fridge, only to find it filled with something… unrecognizable? Maybe a science project instead of last week’s leftovers? Yep. We’ve all been there.

Food loss is a huge problem. Not just for your pocket, but for the world too. The average family loses over $1,500 worth of food every year. That’s money straight into the trash.  

But here’s the good news. The right food storage bins can help you reduce waste, keep food fresh longer, and save space in your fridge. No more useless veggies. No more dried-out leftovers. Just fresh, organized, and easy-to-find food. And if you’re dealing with a cramped fridge, don’t worry, there are best food storage containers for small spaces that maximize every inch.  

Let’s explore and find the best food storage cases to keep your fridge in top shape.

Why Picking the Right Food Storage Container Matters

A variety of food storage containers, including glass, plastic, and stainless steel, neatly arranged on a kitchen countertop.

Not all objects are made equal. Some keep food fresh for days, while others barely last 24 hours. Some save space, others take up way too much room.

Choosing the best food storage containers for fridge use is key. But how do you know what’s right for you?

First, think about your wants. Do you meal prep? Store lots of leftovers? Buy in bulk? Your habits decide the type of food storage bins you need.

Here’s what to consider:

  • Material Matters: Glass, plastic, rubber, or stainless steel? Each has its pros and cons.
  • Size & Shape: Round, square, stackable? You need ones that fit your fridge space.
  • Sealing Ability: Airtight lids keep food fresher longer. Leak-proof features avoid messes.
  • Durability & Safety: Can they handle the freezer, microwave, and dishwasher? Are they BPA-free?

Now that you know what to look for, let’s check out the best food storage bins for small areas, meal prepping, and keeping food fresh.

How My Neighbor Fixed Her Messy Fridge with the Right Containers

A side-by-side comparison of a cluttered fridge before and an organized fridge after using food storage containers.

My neighbor, Lisa, is a terrific chef. But her fridge? A terrible calamity.

The other day, I went over to borrow some eggs. When she opened her fridge, I almost gasped. Stacks of mismatched plastic containers, half-covered dishes, and ziplock bags stuffed with who-knows-what spilled forward. A withered bag of spinach remained abandoned in the back, and a mystery sauce had poured onto the bottom shelf.

“Don’t judge me,” she groaned, tossing items aside to make room. “I swear I just cleaned this last week.”

I couldn’t help but chuckle. “Lisa, you need a system. You need the best food storage containers for fridge organizing. Something airtight, stackable, and simple to look through.”

She grumbled. “I know! But my fridge is so small, I don’t have room for those enormous, cumbersome containers.”

That’s when I brought out my phone and gave her some alternatives. “Look, there are best food storage containers for small spaces that fit perfectly. Stackable glass containers, vacuum-sealed bags, even collapsible silicone ones. No more wasted food, no more mess.”

A week later, she asked me over again. This time, her fridge was a dream. Everything is nicely arranged, labeled, and simple to locate. “I can actually see my food now,” she smiled. “And guess what? I haven’t thrown away a single item all week.”

Mission completed.

Features to Look for in the Best Food Storage Containers

An infographic highlighting key features of food storage containers, including airtight lids and BPA-free materials.

Before we talk names, let’s cover the must-have features.

1. Airtight & Leak-proof

If air gets in, food spoils faster. Simple. Containers with strong locks help avoid this.

2. Microwave, Freezer & Dishwasher Safe

Convenience counts. Nobody wants a high-maintenance container.

3. BPA-Free & Eco-Friendly

You don’t want dangerous chemicals near your food. Plus, reused containers = less waste.

4. Stackability

Got a small fridge? Then stacked bins are a must. They save room and keep things neat.

Transparent Design: Being able to see your food means you won’t forget about it. No more secret food.

Now, onto the fun part, the best food storage bins for fridge organizing and keeping food fresh!

Top 3 Best Food Storage Containers for Fridge Use

1. Budget Pick: Rubbermaid TakeAlongs (~$10)

Rubbermaid TakeAlongs are cheap, lightweight, and easy to store. They’re great for meal preppers, college students, or anyone looking for a budget-friendly choice.

Why You’ll Love It: 

  • Super affordable, a whole set for around $10. 
  • Lightweight and easy to stack, perfect for small areas. 
  • Microwave and dishwasher safe, no stress about cleanup.

Downside? They’re not airtight. So, food won’t stay fresh as long as in other containers.

2. Mid-Range Pick: Glasslock 18-Piece Set (~$30–$35)

It’s made of toughened glass, so it’s super strong and safe. Unlike plastic, it doesn’t stain or absorb food smells. And it locks in freshness like a champ.

Why You’ll Love It: 

  • 100% airtight & leak-proof, food stays fresh longer. 
  • Oven, microwave, freezer & dishwasher safe, super versatile. 
  • No plastic, no chemicals, safe for you and the world.

🚨 Downside? It’s heavier than plastic. Lids can also be tricky to snap on at first.

3. Premium Pick: FoodSaver Vacuum Sealing System (~$80–$120)

This thing removes air totally, keeping food fresh up to 5x longer. It’s the best food storage jar for fridge and freezer use, no more freezer burn!

Why You’ll Love It: 

  • Food stays fresh for months, not days. 
  • Great for bulk buying & saving. 
  • Saves fridge & freezer space, bags take up less room than containers.

Downside? Higher upfront cost. Also, needs vacuum-seal bags.

Best Practices for Using Food Storage Containers

A set of neatly labeled food storage containers filled with fresh vegetables, bread in a vacuum-sealed bag, and portioned frozen meals, arranged in an organized fridge.

Got the best food storage containers? Awesome. Now, let’s use them properly:

  • Veggies last longer in closed glass cases. No more limp lettuce.
  • Bread stays fresh in vacuum-sealed bags. No more cold slices.
  • Store milk and cheese on the fridge shelf, not the door. The temperature is more stable there.
  • Freeze leftovers in amounts. That way, you only thaw what you need.

Label everything! No more “what the heck is this?” times.

Eco-Friendly Food Storage Options

Let’s be real. Plastic trash is a problem. But moving to reusable food storage bins helps cut down on waste.

  • Glasslock (glass) and silicone containers are the best choices. 
  • Beeswax wraps replace plastic wrap for short-term food storage. 
  • Reusable vacuum-seal bags reduce waste.

Better for you. Better for the world.

Final Thoughts: Stop Wasting Food & Start Saving Money!

Stop throwing money (and food) away! Investing in the best food storage containers is a small change that makes a huge impact. Not only does it keep your fridge organized, but it also helps reduce waste, preserve food freshness, and save you hundreds of dollars every year. Whether you need the best food storage containers for the fridge to keep your leftovers fresh or the best food storage containers for small spaces to maximize storage, the right choice makes all the difference. Pick wisely, store smart, and enjoy fresher, better-tasting food while cutting down on waste!

How to Clean a Burnt Stainless Steel Pot Without Scratching It

A before-and-after comparison of a burnt stainless steel pot and a fully cleaned version.

So you left your beautiful pot on the heat for too long? Oh, wait. You were multitasking like a professional, right? And the next second poof your dinner has transformed into a smoky, crusty disaster. Your steel pot looks like it was just hit by an asteroid and is now burnt and black. You could just throw it away and hide it from your family and pretend it never happened or you could learn how to clean a burnt pot like you are a kitchen magician.

Don’t worry, I am here to assist you to repair it for you. I need you to stay with me for just a few minutes. Whether you are on a budget, like a basic scrub, or want a power tool to do that job for you, there is always a solution to every emergency.  No matter how it looks, even if it’s hopeless now, with the best cleaner for burnt pots and pans, your kitchen will shine again in a few minutes. Grab your cleaning supplies (and maybe say a little prayer so your mom doesn’t walk into the kitchen right now) because we are about to work some cleaning magic. 

What Causes Burnt Pots? (And How to Avoid It Next Time)

A stainless steel pot with burnt residue on the bottom, sitting on a stovetop.

Before we dive into fixing the mess, let’s talk about how it even happened in the first place. Burnt pots aren’t just bad luck, they’re usually caused by:

1. High Heat

Cooking on high heat without enough liquid can cause food to stick and burn.

2. Distractions

Stepping away for “just a second” (which turns into 10 minutes) can leave your pot burned.

3. Not Enough Stirring

Ingredients sitting in one spot too long will burn, especially in stainless steel pots.

4. Thin Cookware

Cheap, thin-bottomed pots heat unevenly and burn food faster.

How to Prevent It:

  • Use medium or low heat for delicate foods.
  • Stir frequently, especially when making sauces or grains.
  • Set a timer, even for simple jobs.
  • Invest in good-quality, thick-bottomed pans.

Now that you know what went wrong, let’s fix that burned pot!

That One Time I Almost Burnt Down the Kitchen at a Party

A smoky kitchen with a burnt pot on the stove and a group of people reacting.

Last weekend, my friend threw a wild house party, and somehow, I ended up in charge of cooking. “Just make your famous pasta sauce,” they said. Easy, right?

Wrong.

Between talking, refilling drinks, and dodging an overly enthusiastic dancer in the kitchen, I totally forgot about the pot on the stove. By the time I turned around, smoke was rising like a warning fire. The stainless steel pot was ruined—blackened, burnt, and smelling like a crime scene.

Everyone rushed in. Some laughed, some gagged, and my neighbor loudly waved a dish towel like a flag of submission. “Dude… that pot is DONE,” someone said.

I refused to accept the loss. My best tools couldn’t go down like this. But at that moment, with my burnt pot sitting there like a sad accident, I had no idea what to do.

DIY Step-by-Step: How to Clean a Burnt Pot

A person cleaning a burnt stainless steel pot with baking soda and a sponge.

Step 1: Assess the Damage

  • Check how bad the burn is.  
  • Light burns? Easy fix.  
  • Thick, blackened mess? You’ll need extra cleaning power.  

Step 2: Boil Water in the Pot

  • Fill the pot with water, covering the burnt parts.
  • Place it on the stove and bring to a boil.
  • Let it cook for 10–15 minutes to loosen the burned residue.

Safe for stainless steel pots, but be gentle with non-stick ones!

Step 3: Add Baking Soda & Let It Sit

  • Remove the pot from the heat.
  • Sprinkle a large amount of baking soda into the hot water.
  • Let it sit for 10–15 minutes to break down the burnt bits.

For extra power, add vinegar for a fizzing response!

Step 4: Scrub Gently

  • Use a sponge, wooden spatula, or soft brush.
  • Scrub the damaged areas softly.
  • If the spots are stubborn, move to the next step.

Avoid steel wool on stainless steel pots, it can scratch them!

Step 5: Use a Baking Soda Paste

  • Mix equal parts baking soda and water to make a thick paste.
  • Spread it over the burnt areas and let it sit for 30 minutes.
  • Scrub again to clear any leftover spots.

For tough stains, let the paste sit overnight!  

Step 6: Rinse & Dry

  • Rinse the pot thoroughly with warm water.  
  • Dry immediately to prevent water spots.  
  • Wipe with a soft cloth for a final shine.  

Product recommendation 

A set of cleaning products, including a powder cleanser, sponges, and a drill brush, arranged on a kitchen counter.

(a) Bar Keepers Friend Powder Cleanser (~$3–$5)

Let’s start cheap. Like, $3 cheap. Bar Keepers Friend is a lifesaver. Seriously. This powder cleanser is magic in a can. It works on stainless steel, copper, and even glass. And it’s perfect for how to clean a burnt pot without breaking the bank.

Here’s how to use it:  

  1. Fill your pot with hot water.  
  2. Sprinkle in some Bar Keepers Friend. Let it sit for 15–20 minutes.  
  3. Grab a sponge (non-scratch, please!) and start scrubbing.  
  4. Rinse it out. Boom. Done.  

Wear gloves. This stuff is strong. And don’t inhale it. Trust me.  

(b) Scotch-Brite Non-Scratch Scrub Sponges (multi-pack) (~$10)

Not into powders? No problem. Scotch-Brite Non-Scratch Scrub Sponges are your next best bet. They’re gentle but tough. Perfect for how to clean a burnt stainless steel pot without scratching it.  

Here’s the drill:

  1. Sprinkle baking soda or dish soap on the burnt spots.  
  2. Use the Scotch-Brite sponge to scrub in circles.  
  3. Rinse and repeat if needed.  

Easy, right? Just don’t use these on non-stick pans. They’ll ruin the coating. And nobody wants that.

(c) Drill Brush Power Scrubber Cleaning Kit (~$15–$20)

Now, if you’re feeling fancy (or just really, really frustrated), the Drill Brush Power Scrubber Cleaning Kit is your go-to. It’s like a power tool for your pots. And yes, it’s worth every penny.

Here’s how it works:  

  1. Attach the brush head to your drill.  
  2. Spread some baking soda paste or dish soap on the burnt areas.  
  3. Turn on the drill (low speed, please!) and start scrubbing.  
  4. Rinse and dry.  

This thing is a game-changer. But be careful. Don’t go too hard or you might damage your pot.  

Extra Tips Because Why Not?

Want more? Of course you do. Here are some bonus tips:  

  • Vinegar and Baking Soda: Mix them. Let it sit. Scrub. Magic.
  • Lemon Juice: Cut a lemon in half, add some salt and scrub. Works like a charm.  
  • Prevention: Lower the heat. Stir often. Don’t walk away. Simple, right?  

And hey, if you’re looking for the best cleaner for burnt pots and pans, you can’t go wrong with any of these methods.  

Final Thoughts: How to clean a burnt stainless steel pot

So, now you know how to clean a burnt pot like a pro! No more scrubbing endlessly or thinking about tossing your cookware in the trash. Even if you’re dealing with the toughest mess, including how to clean a burnt stainless steel pot, these simple tricks will get the job done. And if you ever need the best cleaner for burnt pots and pans, just remember, that hot water, baking soda, and a little patience go a long way. Now, go save that pot… and maybe set a timer next time.

How to Declutter a Small Apartment in One Weekend (Step-by-Step Guide)

How to Declutter a Small Apartment

You walk into your apartment. Decluttering small apartment spaces feels impossible when there’s a pile of clothes on the chair (because the chair is the new wardrobe, right?). Shoes are scattered near the door, and there’s a mountain of random papers on the table that looks like it’s preparing for Everest. Oh, and your closet? It’s basically a Bermuda Triangle where socks, chargers, and your favorite hoodie vanish without a trace.  

Sound familiar?  

You’re drowning in stuff. Your small apartment feels even smaller because clutter multiplies faster than rabbits on a sugar rush. Every corner, shelf, and drawer is packed like a game of Tetris, and you’re losing.

But here’s the good news: decluttering small apartment doesn’t have to feel like a battle. Whether you’re a pro organizer or a rookie just starting out, a few decluttering tips for beginners can transform your space and your sanity. Let’s dive in and reclaim your floor before your socks stage a rebellion.

How Clutter Took Over My Friend’s Life (And How He Took It Back)

Before I dive into some powerful decluttering apartment tips, let me tell you a story about my friend.

He’s the kind of guy who swears he’s “not that messy,” yet somehow his apartment looked like a tornado hit it. Clothes on the chair, shoes scattered like breadcrumbs, and his coffee table? Buried under receipts, chargers, and half-read books. It got so bad that he started leaving his car keys with his neighbor because finding them in his own apartment felt impossible.  

One morning, running late for work, he realized his laptop charger was missing too. That’s when it hit him, the clutter was controlling his life. He spent that weekend purging junk, organizing his stuff, and finally giving everything a proper place. Now? He’s less stressed, never loses his keys, and actually enjoys coming home.  

Trust me, if he can declutter, anyone can.

Decluttering Small Apartment: The Step-By-Step Survival Guide

It’s overwhelming. You don’t know where to start. You’d rather binge-watch Netflix than deal with this mess. But hold on. The secret? Start SMALL. One corner, one drawer, one shelf at a time. No pressure, no panic.

Step 1: The Ruthless Purge: Because Less Is More

Look around. Be brutally honest. How much of this stuff do you actually need?

  • Clothes you haven’t worn? Donate.  
  • Expired makeup? Trash.  
  • That box of “I might use it someday” junk? Face it. You won’t.  

A study from the National Association of Professional Organizers found that 80% of the stuff we keep is never used. Yes, you read that right. Most of what’s in your apartment? Useless clutter eating up space.

A person sorting through clothes and household items, placing them into "Keep," "Donate," and "Trash" piles.

Step 2: Decluttering Clothes: The Brutal Truth

Clothes are emotional. We attach memories to them. That old concert T-shirt from 2010? That “someday” outfit you never wear?

Here’s the test: Would you buy it again today? If the answer is no, bye-bye.

Sort your clothes into three piles: Keep, Donate, and Trash. Be ruthless. That shirt with a mystery stain you swear will “come out someday”? Gone. Those jeans you’ll “fit into after your salad-only diet”? Let them go. Decluttering your clothes is like ripping off a bandage, fast and firm is the way to go.

A wardrobe with neatly folded clothes and organized sections after a decluttering session.

Step 3: The ‘Daily Essentials’ Rule: Save Yourself the Stress

Do you know what’s worse than clutter? Losing your important stuff.

Pick one spot, by the door, on a shelf, or in a bowl, and make it your “essential station.” Keys, wallet, headphones… all the daily must-haves go here.

No more 20-minute searches for your car keys while questioning your life choices.

 A small entryway table with a neatly arranged tray holding keys, a wallet, and sunglasses for daily use.

Step 4: The “Maybe Later” Box: For the Hesitant Hoarder

Feeling unsure about some items? Use a “Maybe Later” box.  

  • Put questionable items in the box.  
  • Seal it.  
  • Mark the date.  

If you don’t touch that box in 3 months, it’s clear, you don’t need it. Donate it without opening it. Trust me, you won’t miss it.

Step 5: The ‘15-Minute Rule’ Because Rome Wasn’t Decluttered in a Day

Decluttering doesn’t have to take hours. Set a 15-minute timer each day.

  • Clear one drawer.  
  • Clean one shelf.  
  • Toss one bag of trash.  

Small wins add up. Stick to this daily habit, and soon your apartment won’t just feel tidy, it’ll feel bigger, calmer, and actually livable.

Smart Storage Hacks: Because You Need More Space

A small apartment with space-saving storage solutions like floating shelves, hanging organizers, and under-bed storage.

You don’t have a mansion. So you need to be clever. Here’s how:

(a) Budget: SimpleHouseware Over-The-Door Organizer (~$10–$12)

  • Space-Saving Design: Ideal for small apartments, this slim organizer fits inside cabinets, maximizing vertical space without cluttering countertops.
  • Versatile Installation: Mount it over cabinet doors, on walls, or directly inside cabinets, hardware screws included for easy setup.
  • Multi-Purpose Storage: Perfect for organizing cutting boards, bakeware, or even toiletries in your bathroom.
  • Scratch-Free Protection: Features an ultra-thin 1-inch hook with EVA foam padding to prevent cabinet door damage.

(b) Normal: ClosetMaid Cube Storage Organizer (~$20–$25)

  • Flexible Display Options: The 3-cube organizer offers both horizontal and vertical setups, ideal for maximizing space in a decluttering small apartment.
  • Multi-Purpose Storage: Perfect for decluttering clothes, books, toys, and decorative items, great for beginners looking to simplify their space.
  • Expandable Design: Stack multiple units to create customized storage solutions for apartments, dorms, or compact rooms.  
  • Quick & Easy Assembly: Includes all hardware for a hassle-free setup, a practical choice for those exploring decluttering tips for beginners.

(c) Premium: SONGMICS 6-Cube DIY Modular Storage (~$30–$35)

  • Sturdy and Reliable: Each cube can hold up to 22 lbs, ensuring your items stay secure, perfect for decluttering small apartments with limited space.
  • Customizable Design: Arrange the cubes in ladder shapes, shelving units, or creative layouts to fit your room’s needs, ideal for flexible decluttering tips for beginners.
  • Quick Assembly: Comes with a rubber mallet for effortless setup or disassembly, making it easy to move or adjust when reorganizing.  
  • Space-Saving Solution: Raised feet keep the storage unit above the floor, protecting items from dust while maximizing vertical space, a smart choice for decluttering clothes or everyday essentials.

Decluttering Tips for Beginners Because We All Need Help

A person using a checklist while decluttering a small apartment, sorting through various items.

Feeling lost? Don’t worry. These no-nonsense tips will get you started, no pressure, no panic.

1. One In, One Out Rule

Every time you buy something new, make it a rule to remove one old item. Did you buy a new pair of shoes? Donate or toss a pair you never wear. This method keeps clutter from sneaking back in while maintaining balance.

Make this automatic. Before you even bring new items home, mentally decide what’s leaving.  

2. 12-12-12 Rule

This clever trick makes decluttering fast and easy. Find:  

  • 12 items to throw away: Broken, expired, or just plain useless.
  • 12 items to donate: Clothes, books, or decor someone else can enjoy.
  • 12 items to keep: Stuff you genuinely use and love.  

It’s structured yet flexible. Doing this once a month can transform your space without overwhelming you.  

3. The 5-Second Rule: Decide Fast, Declutter Faster

Don’t overthink it. When sorting through your stuff, give yourself five seconds to decide:

  • Keep it: If you use it regularly or genuinely love it.
  • Toss it: If it’s broken, useless, or just taking up space.
  • Donate it: If someone else could benefit from it.  

Overthinking slows you down. The faster you decide, the quicker you’ll finish, no emotional battles with your old gym shoes are required.

4. Go Vertical: Maximize Wall Space

When floor space is tight, walls become your best friend. Install:  

  • Floating shelves for books, plants, or small decor.  
  • Hooks for bags, jackets, and keys.  
  • Wall-mounted baskets for mail, notes, or kitchen essentials.  

The result? More space without cramming everything into your precious floor area.  

5. Be Honest: The Brutal Reality Check

Let’s face it, some items are just ugly, broken, or utterly pointless. That chipped coffee mug? Gone. The stack of mismatched socks? Toss ’em.

Ask Yourself:  

  • Do I use this regularly?  
  • Would I buy it again today?  
  • Is it actually adding value to my life?  

If the answer’s “no,” out it goes.  

Decluttering isn’t magic, but with these simple tips, your home can feel lighter, cleaner, and more peaceful without driving you insane.

Declutter Your Home Checklist: No Excuses, Just Action

Living in a decluttering small apartment can feel overwhelming, but this no-nonsense checklist will help you clear the chaos fast. No more “I’ll do it later.” Let’s get things moving.

1. Clothes You Don’t Wear? Let Them Go

We all have that “someday” outfit. The one we swear we’ll wear when we lose 10 pounds, when we attend that fancy event, or when the weather magically aligns with that one jacket we bought three years ago. The truth? If you haven’t worn it in over a year, chances are you never will.

Ask yourself these questions:

(i) Would I buy this again today?

(ii) Does this fit me right now?

(iii) Do I feel good when I wear it?

If the answer is “no,” it’s time to donate it. Local shelters, thrift stores, or clothing drives will gladly take them. Don’t let guilt trap you in a closet full of unused clothes. Decluttering clothes creates space for the items you actually wear — and love.

2. Outdated Items in the Kitchen? Toss Them

Expired food, stale spices, and forgotten snacks are all clutter culprits. Open your pantry and fridge, and be ruthless.

Check for:

  • Expired spices (yes, they lose flavor over time).
  • Half-used sauce bottles you forgot about.
  • Mystery leftovers lurking in the back of the fridge.

That trendy kitchen gadget you swore you’d use but never did? It’s just taking up valuable space. Unless you plan to use it this week, consider donating or selling it.

3. Paper Piles Taking Over? Clear Them

Piles of paper can multiply faster than you realize. Old bills, receipts, takeout menus, or random flyers, pile up quickly.

Here’s what to do:

  • Keep essential documents like contracts, tax records, and medical files in a dedicated folder.
  • Shred or recycle old receipts, expired coupons, and junk mail.
  • Scan important documents to reduce paper clutter even further.

Decluttering small apartment often starts with managing paper clutter, it’s sneaky, yet surprisingly impactful when sorted.

4. Broken or Useless Electronics? Out They Go

That old phone charger you “might need someday”? Or that broken alarm clock you swore you’d fix? Let’s be honest, they’re just gathering dust.

Here’s the rule: If it’s broken, outdated, or hasn’t been touched in over a year, it’s time to get rid of it. Electronics recycling centers or donation programs often accept these items.

Fun fact: Studies show that the average household has over 20 unused electronic items just collecting dust. Freeing up this space can drastically improve your apartment’s overall feel.

5. Too Many Random Items? Be Honest

Clutter loves to hide in plain sight, that stack of unread magazines, the overflowing mug collection, or those tangled cables you can’t identify.

Here’s your game plan:

  • Mugs, Keep your favorites; donate the rest.
  • Cables, If you don’t know what it’s for, toss it.
  • Trinkets & souvenirs, Ask yourself if they add value to your space or just collect dust.

When decluttering a small apartment, honesty is your best tool. If an item doesn’t bring value or function to your life, it’s just clutter in disguise.

Final Thoughts: Decluttering small apartment​

Imagine walking into your apartment and feeling calm instead of overwhelmed, no piles of clothes, no misplaced keys, and no mess silently demanding your attention. That’s the power of following a declutter your home checklist combined with smart decluttering tips for beginners. Whether you’re battling overflowing closets or scattered papers, starting small can make a huge difference. Focus on one area at a time, sort through your wardrobe, donate clothes you never wear, and clear out expired food or random cables. These simple yet effective steps are essential when decluttering a small apartment. By staying consistent and organized, you’ll create a home that feels more spacious, peaceful, and easy to manage. So, take action today, your clutter-free future awaits!