
Best Mail Organizer System: 848 Junk Mails a Year! | Stay Clutter-Free

best mail organizer system, A messy kitchen counter with a large stack of mail & papers and flyers next to a coffee mug and car keys

Have you ever stared at that growing mountain of mail on your counter and wondered if there was a best mail organizer system to tame it all? Bills, coupons, postcards from aunt that you swear you’ll read later (but never do). It starts innocently with a small stack. Then suddenly, it’s taller than your coffee mug.

It’s stressful, annoying, and makes your house look like a post office exploded.

But hey, no judgment. Life is busy. And mail? It just keeps coming. An average American household gets over 848 pieces of junk mail a year. That’s around 16 pieces a week. Add some bills, invitations, and tax documents, and suddenly your counter is covered in paper.

So, what’s the solution? Mail organization. A real, tangible system that keeps your counters clutter-free. Whether you need a Mail Organizer Box, a Mail organizer for Wall, or something in between, let’s figure out what works for you.

Why Does Mail Always Win?

A frustrated woman looking at a pile of disorganized mail and papers on a messy kitchen counter.

You swear you’ll handle the mail right away. But life happens. Bills, coupons, random flyers, they multiply faster than rabbits. Before you know it, your kitchen counter looks like the aftermath of a document explosion. That’s where the best mail organizer system for home steps in, your new superhero.

Choosing Your Champion: The Best Mail Organizer System

Three different mail organizers displayed on a wooden desk, showing budget, mid-range, and premium options.

Your mail mess isn’t just a mess; it’s a symptom. You need a strategy, and a good tool. Let’s break down three options based on your budget:

(a) Budget Option: Pag Desktop Mail Organizer ( ~$10–$12 )

  1. Durable Design: This sturdy mail organizer box features a metal mesh frame and waterproof melamine board, ensuring long-lasting use and strong load-bearing capacity.
  2. Space-Saving Storage: With 12 compartments, this organizer efficiently holds mail, magazines, documents, and more, perfect for clearing up counter clutter.
  3. Versatile Organization: Ideal for classrooms, offices, or home use, making it the best mail organizer system for sorting papers, art supplies, and reading materials.

(b) Normal Option: Amazon Basics 3-Tier Metal Document Organizer ( ~$20–$25 )

  1. Effortless Mail Organization: This 3-tier tray is perfect for sorting incoming and outgoing mail, making it an excellent best mail organizer system solution.
  2. Space-Saving Design: Its vertical stacking design helps clear counter clutter, ideal for keeping your workspace tidy and organized.
  3. Durable and Dependable: Built with a sturdy metal mesh frame, this organizer ensures your important documents, mail, and papers are securely stored.

(c) Premium Option: Safco Mesh Desk Organizer with File Drawer ( ~$40–$50 )

  1. Premium Mail Organization: The Safco Mesh Desk Organizer offers a sleek design with multiple compartments and a spacious file drawer, perfect for creating the best mail organizer system in your home or office.
  2. Robust and Reliable: Crafted from durable metal mesh, this sturdy organizer can handle heavy stacks of mail, documents, and files without bending or warping.
  3. All-in-One Storage Solution: With dedicated slots for letters, bills, and important papers, plus a drawer for smaller items, it’s ideal for keeping counters clutter-free and organized.

Each of these champions has one mission: restore order. Choose your weapon wisely.

How to organize mail on the counter

The counter is where mail piles up faster than your unread emails, but don’t worry, reclaiming that space isn’t rocket science. With a few smart moves and a trusty Mail Organizer Box, you can win the war against paper clutter.

Step 1: Divide and Rule

Sorting is your secret weapon. Use labeled trays, baskets, or slots to divide your mail into clear categories. Try these simple groups:

  • Bills: Utility bills, credit card statements, or anything demanding your money.
  • Invitations & Events: Weddings, parties, or that awkward “family reunion” you can’t avoid.
  • Newsletters & Subscriptions: For magazines, catalogs, and those random charity pamphlets.
  • Urgent vs. Non-Urgent: A two-tray system can keep urgent mail front and center while non-urgent papers stay out of sight.

Stackable trays like the Amazon Basics 3-Tier Metal Document Organizer keep things visible yet organized, no more digging through piles.

Step 2: Timing is Everything

Mail doesn’t just pile up because it exists, it piles up because we ignore it. Setting a designated “mail hour” helps.

  • Morning person? Deal with mail during your coffee.
  • Night owl? Handle it with a glass of wine in hand.
  • Busy parent? Tackle it while dinner simmers on the stove.

Treat it like brushing your teeth, annoying at first, but second nature before you know it.

Step 3: The Ruthless Rule

Junk mail has no rights. Be brutal. If it’s not important, shred it.

  • Credit card offers? Gone.
  • Random flyers from businesses you’ll never visit? Gone.
  • That coupon for a discount on skydiving lessons? Probably gone too.

A good Mail Organizer Box makes this easy. Keep a small bin or shredder nearby to dispose of junk mail immediately.

Wall Power: The Mail Organizer for Wall That Saves Space

A wall-mounted mail organizer with labeled slots and key hooks in a bright, organized entryway.

If your counter feels like it’s drowning in paper, it’s time to think vertically. A Mail Organizer for Wall is your secret weapon, sleek, stylish, and impossible to ignore when you pass it daily.

Why does it work so well? Because clutter thrives in forgotten corners, not on your wall where you can’t help but notice it.

Choosing the Right Wall Organizer

When picking a wall organizer, look for these must-have features:

  • Multiple Slots: Perfect for separating bills, letters, and those “urgent but I’ll deal with it later” papers.
  • Hooks for Keys: Seriously, nothing beats walking in, tossing your keys on a hook, and sliding your mail into a neat little slot. Instant victory.
  • Compact Design: Small enough to fit by your entryway, kitchen, or home office, wherever mail tends to pile up.

Combine your wall organizer with a small wastebasket or shredder nearby. Junk mail never gets a second chance.

With a well-placed Mail Organizer for Wall, you’ll turn that chaotic counter mess into a smooth, streamlined system ,  and finally reclaim your space.

Your Mail, Your Rules

A person happily organizing mail into labeled slots in a mail organizer box in a clutter-free home.

1. Adapt to Your Flow

If you naturally toss mail near the front door, place your organizer there. Don’t fight your habits, work with them.

2. Box it Up: A Mail Organizer Box 

is perfect if you prefer a simple, all-in-one solution. Just remember to sort it regularly to avoid a paper avalanche.

3. Create Clear Labels

Whether it’s “Bills,” “Important,” or “Shred This,” clear labels keep your system effortless and foolproof.

4. Stick to a Routine

Pick a set time each week to sort, file, and toss, consistency is key to keeping your system alive.

Final Thoughts: The Road to Freedom: Say Goodbye to the Piles

The right best mail organizer system isn’t magic, but it works wonders. Whether you go budget with the Pag Desktop Mail Organizer, mid-range with the Amazon Basics 3-Tier, or full-on pro with the Safco Mesh Desk Organizer, you’re choosing peace over chaos.

So go ahead. Pick your system. Toss the junk. Clear your counters. And finally, FINALLY, find your car keys without digging through a mountain of mail.

Because you deserve a space that feels calm, organized, and, most importantly, yours.

Home Office Organization Ideas on a Budget | Declutter Fast

budget​ home office organization ideas, A neatly organized home office with a budget-friendly aesthetic featuring a clutter-free desk and smart storage solutions

Working from home is no longer a trend; it’s a lifestyle shift that millions have embraced. Remote work has its perks, but it also brings challenges. You might deal with messy desks, tangled cables, and poor lighting. Plus, there’s always that one drawer filled with mystery items. A messy home office doesn’t look unappealing; it hurts your productivity.

That’s where smart planning comes in. Whether you’re dealing with limited space, tight budgets, or both, this article will walk you through home office organization ideas on a budget that actually work. You can optimize your workspace with smart desk accessories. Also, use closet organization ideas to transform hidden areas. These practical tips help you reclaim your office without spending too much.

We’ll look at budget, mid-range, and premium products. These picks aim to enhance your focus and comfort. By the end, you’ll have the tools, and motivation, to create a home office that fuels your day instead of draining it.

Messy Home Office Nearly Cost My Cousin a Client

Before we get into organizing your home office, let me tell you a quick story.

Aliya, my cousin, is a talented freelance designer who loves her craft. But her home office? Total chaos. Papers were piled high, cables were tangled beneath her desk, and her office closet was more of a black hole than a storage space. She insisted she “knew where everything was,” but when a client urgently needed a file, panic set in.

It took her 20 minutes of frantic searching before she finally found it, buried under a stack of old notebooks. The delay nearly cost her the project. That moment was her wake-up call. She spent the weekend decluttering, repurposing storage bins, and taming the cable mess. Now, her office is calm, her workflow is much smoother, and she never has to scramble for a lost file again.

If your workspace feels anything like Aliya’s used to, don’t wait for a crisis, fix it now. Let’s dive in and get your home office organized!

Assess Your Space: The First Step to a Better Work Environment

A person sorting office supplies and organizing paperwork on a clean desk

Before you dive into organizing, take a moment to examine your workspace thoroughly. Check your current setup first. This is important for a smart change, especially if you want to save money. It’s not just about buying new things. It’s about improving what you already own to match your needs better.

Start with these focus points:

1. Desk Setup

Is your desk cluttered or too small for your daily tasks? Maybe your monitor takes up too much space, or your keyboard doesn’t sit at a comfortable height. A simple monitor riser or repositioning can make a huge difference.

2. Lighting

Poor lighting kills productivity. Is natural light available? Can you reposition your desk to take advantage of it? If not, even a budget-friendly LED lamp with adjustable brightness can change your work vibe.

3. Storage & Accessibility

 Are you constantly reaching, digging, or searching? Identify items you use daily and place them within arm’s reach. Use vertical space, like wall-mounted shelves or pegboards, for things you don’t use as often.

Aligning your workspace with your workflow isn’t a luxury; it’s a strategy. And with clever home office organization ideas on a budget, it’s totally doable. 

Declutter: Letting Go of What You Don’t Need

Clutter doesn’t take up space; it drains your mental energy. If your workspace is overrun with paper piles, unused tech, or visual distractions, it’s time to clear it out. One of the smartest home office organization ideas on a budget is simply learning what to let go of. You don’t need a shopping spree; you need a strategy.

Here’s how to declutter effectively:

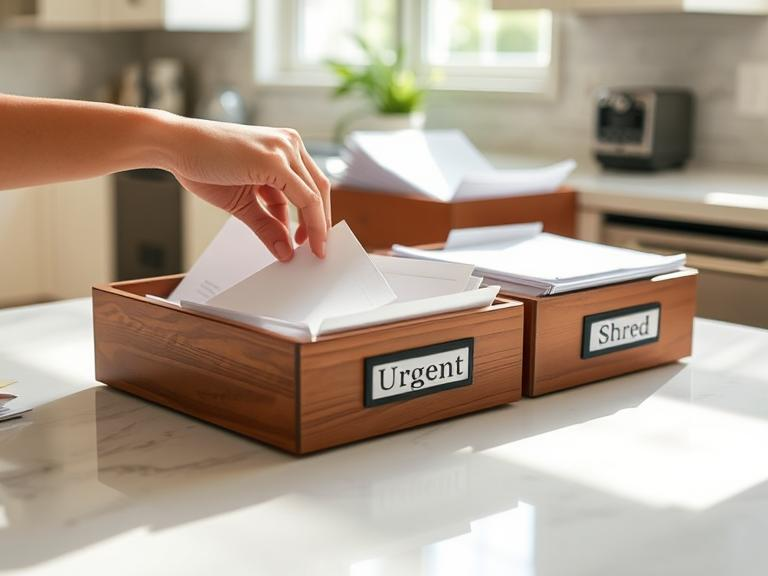
1. Purge Paper Piles

Go through every stack of paper. Share what’s outdated, file what’s important, and scan documents you might need digitally. Apps like CamScanner and Adobe Scan can help you get rid of paper clutter. They make your files easy to access.

2. Toss Outdated Gadgets and Supplies

That old printer you haven’t used in two years? Recycle it. Extra chargers, dried-out pens, and broken headphones take up space but do nothing useful. Donate or discard responsibly.

3. Clear off your desk surface

A clutter-free desk boosts focus. Keep only what you use daily: a laptop, notepad, pen, and maybe one motivational item. Everything else can go in drawers, bins, or on shelves.

To keep your space clean, establish these simple weekly habits:

  • Set aside 15 minutes each Friday for a quick reset. Dispose of trash, return misplaced items, and wipe down surfaces for a fresh start to the weekend.
  • Digital Declutter Day encourages you to organize your digital space weekly. Clean up your files. Delete old downloads and empty your recycle bin. This will help you have a neater and more efficient digital space.
  • Inbox Zero Check-In Keep your email organized and avoid clutter. Set up rules and folders to sort incoming messages. This helps keep your inbox tidy and makes managing your correspondence easier.

Build good habits and stay open to change. This way, your workspace can feel light, organized, and under control. Best of all? These home office organization ideas on a budget won’t cost you a cent. 

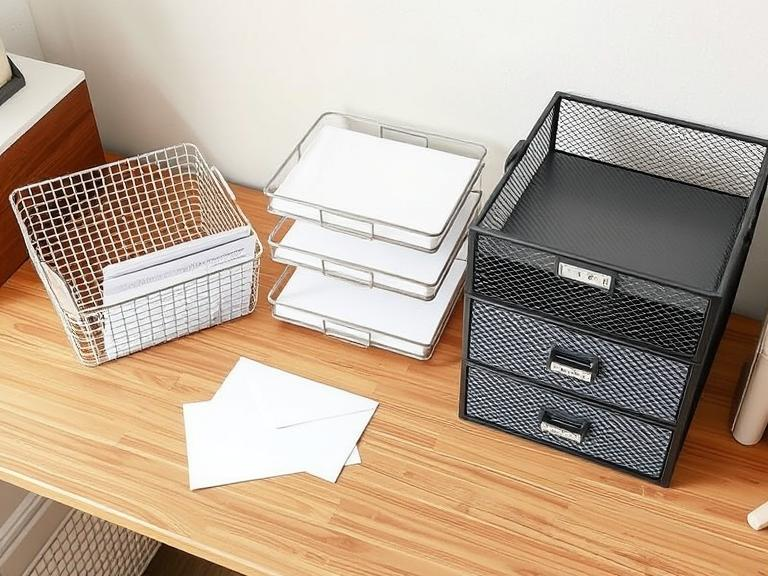
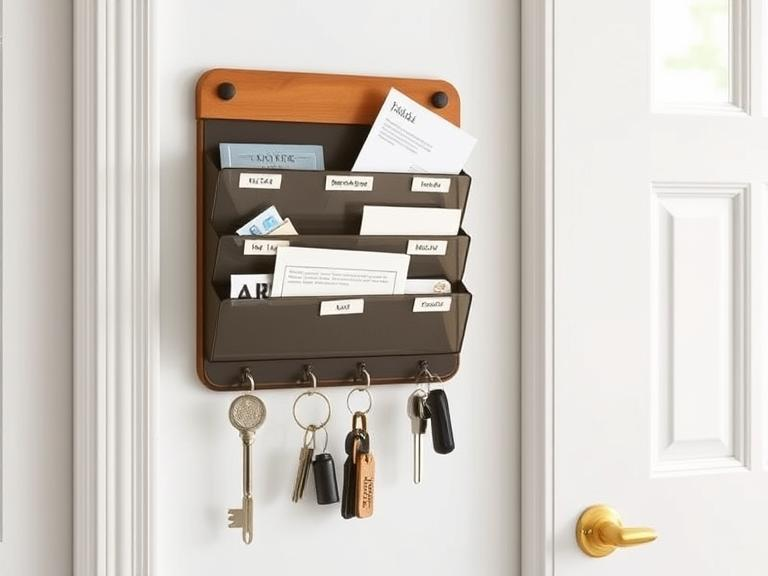
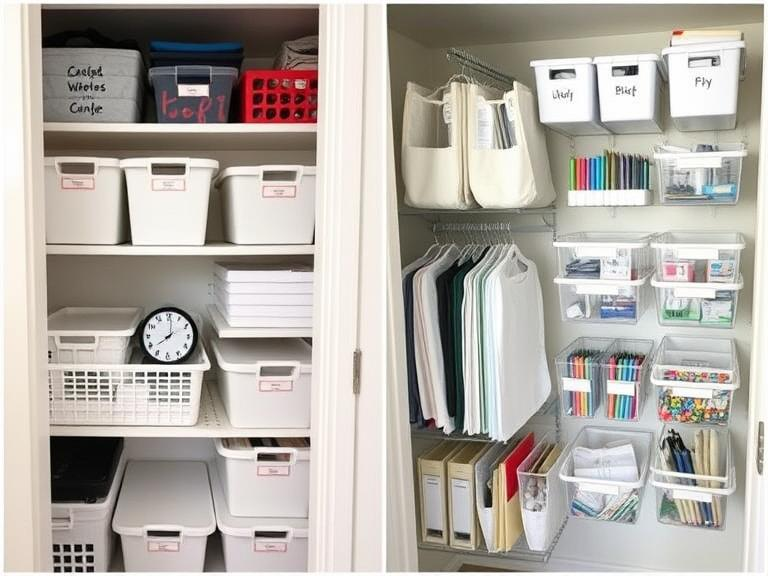
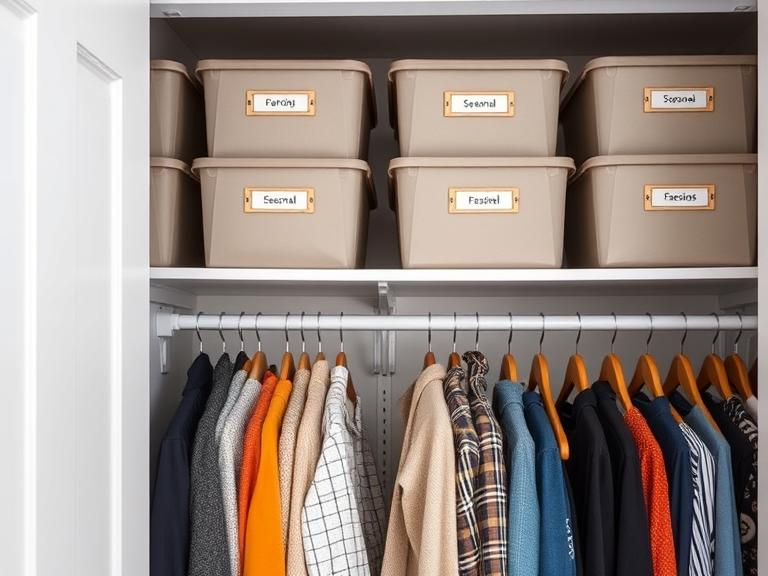
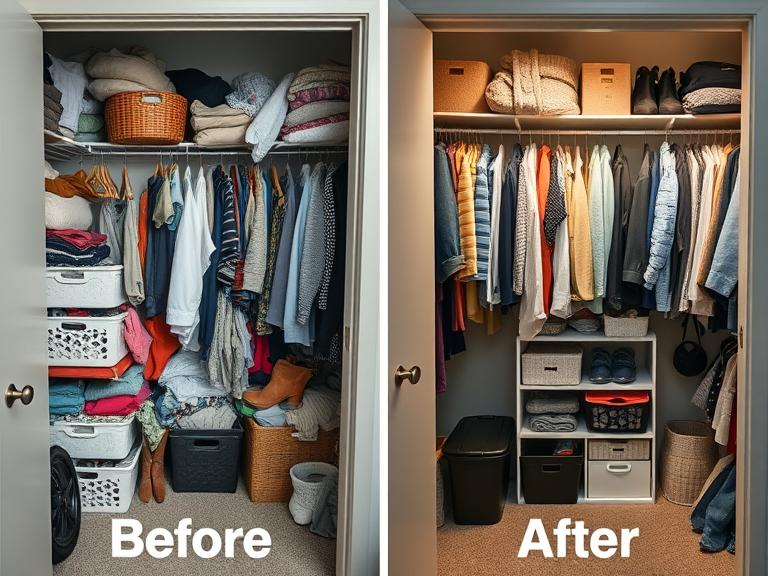
Storage Strategies: Home Office Closet Organization Ideas That Work

A well-organized home office closet with labeled storage bins, neatly arranged supplies, and floating shelves.

When it comes to home office closet organization ideas, making the most of your closet space can revolutionize your workspace. Closets in a home office often go unused. But with some creativity, they can hold files, printers, and office supplies perfectly.

Here’s how to transform your closet into an efficient and functional part of your office:

1. Use vertical space with shelves.

Add shelves at different heights. This way, you can store office supplies, books, and binders. Adjustable shelves can grow with your needs, accommodating larger items or small trinkets. You can even store things like extra paper, ink cartridges, or office décor here to keep them out of sight.

2. Incorporate bins for organization.

Bins are essential for organizing smaller items like pens, cords, and notepads. Clear plastic bins or fabric boxes with labels help to keep everything in its place. Label everything clearly. This way, you can quickly find what you need without digging through it all.

3. Set Up a Printer Zone

A closet works well for your printer. It keeps it hidden but still easy to reach. If your closet is deep enough, add a small table or a pull-out shelf to hold the printer. This helps you keep your workspace tidy. You can still reach your office essentials quickly.

4. Turn unused closet space into a mini workspace.

If you have a closet with ample room, why not transform it into a small nook for deep work? Add a compact desk and an ergonomic chair. This creates a private space to focus without distractions. With clever organization, you can also store extra files and supplies nearby.

These home office closet organization ideas are practical, affordable, and can help you make the most of every square inch in your home office. You can store files, hide your printer, or set up a space for focused work. The options are endless.

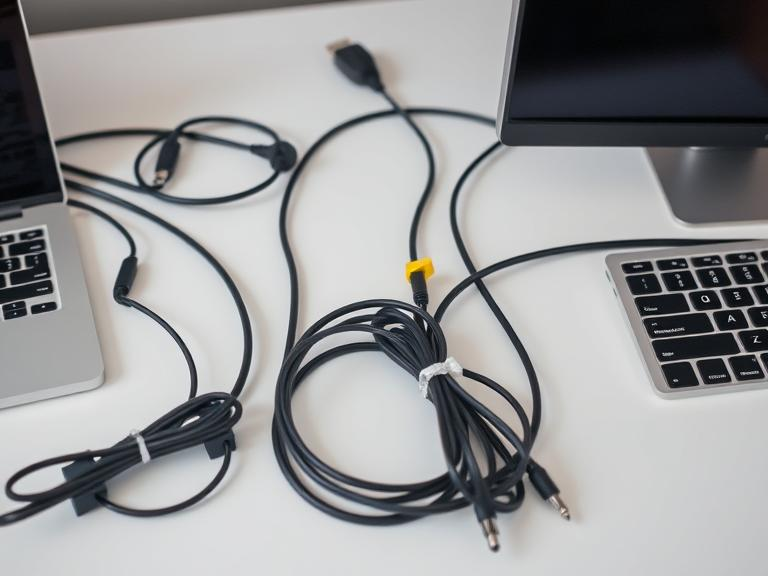
Tame the Tangle: How to Organize Cables for Storage

A tidy desk with organized cables using clips and Velcro ties to prevent tangling.

When it comes to how to organize cables for storage, tangled cords can quickly become a nightmare, cluttering your workspace and creating unnecessary stress. Organize your charging cables, data cables, and even the seldom-used ones. Use practical solutions to keep them neat and easy to access.

Here are a few effective methods for managing your cables:

1. Cable Clips and Ties

Use adhesive cable clips to hold cords along the edge of your desk or wall. For cables you need close at hand, tie them with reusable Velcro ties. This keeps cords from falling to the floor and ensures you can easily grab them when needed.

2. Cable Sleeves

To keep many cables together and avoid tangling, use cable sleeves. These flexible tubes hold several cords together. They keep cords neat and stop them from tangling.

3. Cable Boxes for Bulk Storage

For rarely used cables, store them in a cable management box. You can find options with separate compartments. These keep charging cables and data cables organized. This cuts down on mess.

4. Labeling Cables

One of the most important steps in how to organize cables for storage is labeling. Use small stickers or tags to mark charging cables and data cables. This prevents confusion and saves time when you need to find the right cord.

By following these instructions on how to organize cables for storage strategies, you’ll keep your cords organized, accessible, and tangle-free!

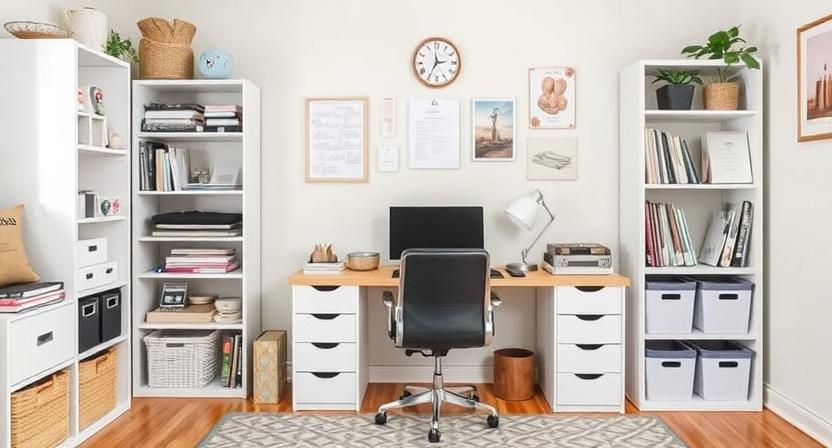
Workspace Essentials: Product Recommendations for Every Budget

Transform your workspace with the right essentials, no matter your budget. From budget-friendly organizers to premium standing desks, here are some home office organization ideas on a budget that will help improve both the functionality and style of your workspace.

1. Budget: AmazonBasics Desk Organizer Tray Set

  • Declutter Your Desk Easily: This steel mesh organizer has several compartments for pens, paper clips, sticky notes, and more office supplies. It keeps your workspace tidy and efficient. You can quickly grab items without digging through piles.
  • Durable and Stylish: This organizer features a sleek black finish and strong steel construction. It lasts long and fits well with any workspace décor. It’s the perfect mix of durability and aesthetics.
  • No More Sliding Chaos: Rubber pads on the organizer’s bottom stop it from sliding. This keeps everything in place. This design keeps your desk safe from scratches. It combines function and style.

2. Mid-Range: TaoTronics LED Desk Lamp

  • Eye-Friendly Lighting: The soft, flicker-free LED light helps reduce eye strain. This is important for long work or study sessions. The lamp provides balanced light that won’t leave you feeling fatigued even after hours of use.
  • Adjustable Brightness: Pick from 18 lighting options for any time or task. Whether you need bright, focused light or a softer ambiance, you can adjust it to your preference.
  • Compact and Functional: This foldable design saves desk space and includes a USB charging port. This makes it easier to charge your devices. You won’t need extra cables cluttering your workspace.

3. Premium: Vari Electric Standing Desk

  • Quick and Easy Setup: The Vari Electric Standing Desk has a pre-installed frame and slide-and-lock legs. You can set up your desk in under 10 minutes. No complicated tools are required, and it’s ready for work in no time.
  • Sturdy and Durable: This desk features strong steel legs and a thick, solid table top for dependable support. It can handle the weight of several monitors, gear, and other work items.
  • Easy Height Adjustment: This desk has four height settings you can program. You can quickly switch between sitting and standing. The smooth electric motor makes transitions easy. It helps improve your posture and keeps you comfortable all day long.

If you want to declutter, boost your lighting, or get ergonomic solutions, these products will enhance your workspace!

Design for Focus: Color, Layout, and Ergonomic Hacks

Creating a workspace that fosters focus is essential, and incorporating home office organization ideas on a budget can make a big impact on your productivity and comfort.

1. Color Psychology for Productivity

Colors influence mood and focus. Soft blues and greens can calm the mind, while yellows and oranges spark creativity. Choose a color palette that aligns with the type of work you do to boost energy and focus.

2. Best Layouts for Limited vs. Open Spaces

In small areas, choose a simple layout. A corner desk works well to save space. For bigger spaces, set up zones. Have one area for work and another for relaxation. This helps keep your mind clear.

3. Affordable Ergonomic Upgrades

Small changes, like an adjustable chair or laptop stand, can help your posture. A mouse pad with wrist support or a footrest helps reduce strain. This way, you stay comfortable during long hours at your desk.

You can turn your workspace into a productivity hub by combining these elements, all without spending too much!

Lighting the Right Way: Natural vs. Artificial Solutions

Home office desk positioned to face a window, reducing screen glare

Natural light is key to boosting mood and energy. Exposure to daylight helps regulate your circadian rhythm, improving focus and reducing fatigue. Studies show that working in natural light can enhance cognitive performance and mood. 

Place your desk near windows for an energy boost. Just avoid direct sunlight to prevent glare. If your space has no windows, use full-spectrum light bulbs. They mimic natural daylight and can boost your mood and energy all day.

1. Choosing and Placing Desk Lamps

Selecting the right desk lamp is crucial for effective task lighting. Choose adjustable lamps with customizable brightness. They light up your workspace well and reduce harsh shadows and eye strain. Position your desk lamp so that it lights your workspace directly, especially for reading, writing, or detailed tasks. 

Ensure the lamp doesn’t cast glare on your computer screen. Lamps with a dimming feature let you adjust the light. This helps you find the right brightness for your task, making it more comfortable and boosting your productivity.

2. Avoiding Screen Glare and Eye Strain

Preventing screen glare is crucial for maintaining comfort during long work sessions. To cut glare, position your desk so it faces the windows. This keeps direct light off your screen. Anti-glare screen protectors or matte-finish monitors can also help reduce reflections. 

Additionally, position your monitor so the top of the screen is at or slightly below eye level. This encourages a more natural viewing angle, reducing strain on your eyes. Take regular breaks using the 20-20-20 rule. Every 20 minutes, look at something 20 feet away for 20 seconds. This helps reduce eye strain.

Weekly Routines to Maintain Your Space

Staying organized and maintaining a tidy workspace doesn’t need hours of effort, just a few simple habits each week:

  • Quick Desk Cleanup: Set aside 10-15 minutes once a week to wipe down surfaces, dust your desk, and organize scattered items. A clean desk promotes focus and reduces stress.
  • Sort Papers Regularly: Keep your workspace clutter-free by sorting through paperwork weekly. File essential documents and toss anything unnecessary to avoid paper piles.
  • Tidy Cords and Cables: Cables can quickly become a mess. Use cable organizers or clips to keep cords in place and prevent tangling. This keeps your desk looking neat and reduces the risk of tripping over cords.

Adding Personal Touches Without Adding Clutter

While personal items enhance creativity, too many can disrupt your workspace. Here’s how to strike a balance:

  • Choose Meaningful Items: Personalize your desk with a few meaningful items that inspire you, such as a photo, a favorite book, or a small plant. But remember, less is more. Too many items can make the space feel crowded.
  • Multi-Functional Decor: Opt for decor that has a function. A stylish storage box can store office supplies while adding a touch of personality. A beautiful calendar can help you stay organized while enhancing the aesthetics.

Seasonal Refreshes: When to Reorganize or Redecorate

Changing things up periodically gives your space a fresh look and keeps your motivation high:

  • Rearrange for New Energy: Changing the layout of your desk or workspace can give you a new perspective. Try different setups to see what works best for your workflow.
  • Seasonal Updates: With each season, bring in small updates that align with the time of year. For example, switch out heavy blankets for lighter ones in spring, or add cozy decor during the winter months. Small seasonal touches can create a refreshing atmosphere without overwhelming the space.

Final Thoughts: Build a Space You Want to Show Up To

Creating an inspiring, functional workspace doesn’t require a hefty budget. Start by using home office organization ideas on a budget to declutter, organize, and make thoughtful investments in key items like desk organizers, task lighting, and ergonomic upgrades. These simple changes can turn your space into a productivity hub, and they won’t cost much.

When considering home office closet organization ideas, think about utilizing every inch of available space for storage. Keep things organized and accessible with shelves, bins, and labels. Also, consider how to organize cables for storage effectively using cable clips or boxes to avoid tangles and keep your desk clean. A great workspace isn’t a luxury; it’s a mindset. Create a space you want to show up to every day, and enjoy the benefits of increased focus and comfort.at tangled mess of cables. You’ve got this.

Kitchen Cross Contamination Prevention: Stop Food Poisoning Before It Starts

kitchen cross contamination prevention

Alright, let’s talk about something that nobody likes to think about but absolutely should, kitchen cross contamination prevention.

I get it. You’re busy. You’re hungry. You’re chopping chicken, tossing salad, and flipping burgers like a pro. But let me ask you, do you enjoy unexpected trips to the bathroom at 3 AM? If not, it’s time to step up your kitchen hygiene game.

Cross contamination is basically when food swaps germs behind your back. And trust me, these germs are not your friends. They’re the kind that turn a delicious meal into a food poisoning disaster.  

So, how do you keep your kitchen from becoming a bacterial breeding ground? Let’s break it down.

Mike’s Kitchen Nightmare: A Cross Contamination Horror Story

Frustrated home cook realizing kitchen cross contamination mistake with raw chicken and vegetables

Let me tell you about my friend Mike. Great guy. Terrible at kitchen hygiene.  

Mike fancies himself a “home chef.” He watches one cooking show and suddenly thinks he’s Gordon Ramsay. One night, he invited me over for his “famous” chicken stir-fry. I watched in horror as he chopped raw chicken on a wooden cutting board, then, without washing, grabbed some bell peppers and started slicing. Same knife. Same board. No hesitation.

“Dude, that’s cross-contamination,” I warned.  

He waved me off. “Nah, the heat will kill the germs.”  

Spoiler: It did not.  

At 3 AM, Mike learned the hard way why kitchen cross contamination prevention matters. His stomach staged a full-scale revolt. By morning, he looked like he’d been through a war.

The next day, he sent me a text: “Buying a color-coded cutting board set. Never again.”

Now, Mike keeps raw meat on the bottom fridge shelf, washes his hands like a surgeon, and never, EVER reuses utensils between raw and cooked food.

Lesson learned: Master kitchen hygiene or risk turning your food into a science experiment.

What Is Cross Contamination of Food?

kitchen cross contamination prevention, Raw chicken and fresh vegetables placed together on the same cutting board

Imagine this:  You slice up some raw chicken on a cutting board. Then without a second thought, you grab a tomato and start choppin, same board, same knife, no washing in between.

Congrats! You just served yourself a salmonella surprise. Cross contamination of food happens when bacteria, viruses, or other nasty stuff gets transferred from one surface (or food) to another.

And the worst part? You can’t see it happening. There are three ways of cross contamination of food you need to watch out for:  

1. Direct Cross Contamination: Raw meat touching ready-to-eat food.

2. Indirect Cross Contamination: Using the same utensils, cutting boards, or unwashed hands to handle different foods.

3. Airborne Cross Contamination: Tiny bacteria floating around your kitchen, looking for their next victim.  

The bad news? This happens all the time. The good news? You can prevent it.  

Types of Cross Contamination: Know Your Enemies

There’s more than one way to mess up your meal. Here are the four main culprits:  

1. Biological Contamination 

The classic bacteria attack. (Salmonella, E. coli, Listeria… the usual suspects.)

2. Chemical Contamination

Cleaning products getting into your food. (Bleach-flavored soup, anyone?)

3. Physical Contamination

Things that shouldn’t be in your meal like hair, plastic, or if you’re really unlucky a band-aid.  

4. Allergenic Contamination

Peanut traces sneaking into food, causing allergic reactions.  

Avoid these, and you’re one step closer to not ruining dinner.  

Kitchen cross contamination prevention (And Keep Your Stomach Safe)

Grill with raw chicken on one side and cooked chicken on the other, separated by tongs

Now that you know what cross contamination of food is, let’s talk about solutions. Because unless you enjoy food poisoning, you’ll want to follow these steps.  

1. Use a Color-Coded Cutting Boards Set

If you’re using the same cutting board for everything, you’re basically rolling the dice with your health.

Solution? Get yourself a color-coded cutting board set:  

  • Red = Raw Meat  
  • Yellow = Poultry  
  • Green = Vegetables  
  • Blue = Seafood  

This keeps your food safe and separate which is exactly what we want.  

Best Cutting Board Options:

(a) Budget: Dexas Heavy Duty Grippmat (~$8–$10)

  • Color-Coded for Safety: Set of four brightly colored 11×8-inch cutting boards to prevent cross contamination in your kitchen. Perfect for raw meat, vegetables, poultry, and seafood!
  • Durable & Flexible Design: Lightweight, non-porous, and non-absorbent boards that easily fold and roll to transfer food without mess.  
  • Non-Slip Backing for Stability: Each cutting board features a grip backing to prevent slipping while chopping, ensuring safe and easy meal prep (not reversible).  
  • BPA-Free & Dishwasher Safe: Made from food-safe materials, these cutting boards are dishwasher-friendly and recommended by top critics, including America’s Test Kitchen and Cook’s Illustrated.

(b) Mid-Range: Farberware Color-Coded Cutting Board Set (~$15–$20)

  • Eco-Friendly & Durable: Made from 97% recycled plastic bottles, these cutting boards are a sustainable choice for eco-conscious kitchens.  
  • Reversible & Versatile: Enjoy two-sided cutting surfaces with three size options (8.5×11.3”, 10.8×14.5”, 12.7×17.2”) to handle all your meal prep needs.  
  • Non-Slip Stability: Featuring grip edges to prevent movement, ensuring safe and hassle-free chopping every time.  
  • BPA-Free & Easy to Recycle: Crafted from non-absorbent, odor-resistant recycled plastic, with removable silicone corners for effortless recycling.

 (c) Premium: Joseph Joseph Index Cutting Board Set (~$45–$60)

  • Space-Saving Slimline Case: Designed for organized storage, keeping your kitchen clutter-free.
  • Knife-Friendly & Non-Slip: Double-sided textured cutting surfaces with non-slip feet for precise, safe chopping.
  • Easy Selection & Accessibility: Tiered design with stainless-steel bars for quick and effortless board selection.  
  • Hygienic & Airflow-Friendly: Fingerprint-proof stainless-steel case holds boards separately, allowing air circulation to reduce bacteria buildup.

2. Wash Your Hands Like Your Life Depends On It

I shouldn’t have to say this, but here we are. Washing your hands before, during, and after food prep is non-negotiable.

  • Scrub for at least 20 seconds (or just sing Happy Birthday twice).  
  • Use soap (water alone won’t cut it).  
  • Dry with a clean towel (not the one you used to wipe the counter).  

3. Keep Raw Meat in Its Own VIP Section

You wouldn’t store dirty socks with clean laundry, right? So why would you store raw meat next to fresh veggies?

How do you prevent cross contamination in your fridge?  

  • Bottom shelf = raw meat. (Because gravity is a thing.)  
  • Use sealed containers to prevent leaking.  
  • Keep dairy and fresh produce far, far away.  

This simple trick reduces bacteria spread and keeps your fridge from becoming a petri dish.  

4. No Sharing Between Raw & Cooked Foods

This one’s simple: Raw meat and cooked meat don’t mix.  

  • Don’t use the same knife for raw chicken and cooked chicken.  
  • Don’t use the same tongs to flip raw and cooked food.  
  • Don’t reuse marinade from raw meat on cooked food.  

If you must reuse utensils, wash them properly before using them again.  

5. Disinfect Surfaces Like a Pro

Wiping a cutting board with a damp cloth does NOT clean it.  

Use:  

  • Hot, soapy water  
  • A diluted bleach solution (1 tablespoon of bleach per gallon of water)  
  • Antibacterial sprays or wipes  

Surfaces to clean regularly:  

  • Cutting boards  
  • Kitchen counters  
  • Sinks  
  • Handles (fridge, oven, cabinets)  

6. Stop Playing the “Smell Test” Game

“If it smells fine, it’s fine.”  WRONG. Bacteria don’t always have a smell. Food can look and smell okay but still be contaminated.  

Trust expiration dates, storage guidelines, and common sense, not your nose.  

How Do You Prevent Cross Contamination in Your Fridge?

Organized fridge with raw meat in sealed containers on the bottom shelf and fresh produce on top shelves.

Since your fridge is ground zero for food storage, here’s how to keep it safe:  

  • Raw meat = bottom shelf (ALWAYS).  
  • Veggies & fruits = top shelf or drawer.  
  • Dairy = middle shelf, away from meat.  
  • No stacking raw meat on top of anything (unless you enjoy meat juice surprise).  

These simple steps prevent bacteria from spreading and ruining your meals.  

Final Thoughts: Keep It Clean, Keep It Safe

Look, I get it, kitchen cross contamination prevention isn’t the most exciting topic. But neither is food poisoning.  

So, let’s recap:  

  • Wash your hands like your life depends on it.  
  • Get a color-coded cutting board set (seriously, it’s a game-changer). 
  • Store raw meat properly (bottom shelf, sealed containers).
  • Use separate utensils for raw and cooked food, this is how to prevent cross contamination like a pro.
  • Clean everything thoroughly.  

Do these things, and you won’t have to worry about your next meal sending you straight to Food Poisoning Hell. Wondering how do you prevent cross contamination in your fridge? Same rules apply, keep raw meat sealed and away from ready-to-eat food.

Stay safe, stay clean, and happy cooking! Master kitchen cross contamination prevention, and your stomach will thank you.

How Maximizing Closet Space: Save 50% Room Fast | Stay Clutter-Free Now

A well-organized closet with neatly hung clothes, storage boxes, and a shoe rack, showcasing an efficient use of space.

Introduction

Have you ever opened your closet door, and it feels like a mini avalanche? Shirts spilling out, shoes piled like a mountain, and somehow your winter coat is hugging your summer dress. Yeah, it’s chaos. But hey, I get it. So, how maximizing closet space can save your sanity? Well, grab a cup of coffee (or whatever keeps you going), and let’s talk closets.

Closets are like the junk drawer of your bedroom. Everything just… lands there. But guess what? You can fix it. And you don’t need some fancy, Hollywood-style makeover to do it. You just need the right tricks and tools.

Why Does Closet Space Disappear So Fast?

A cluttered closet overflowing with clothes, shoes, and accessories, creating a messy and disorganized look.

Your closet isn’t shrinking, your stuff is just multiplying faster than you realize. Here’s why:

1. Unworn Clothes Pile Up

On average, Americans own 53 items they never wear. That’s like half a wardrobe taking up valuable space.

2. Clutter Hides Your Favorites

When unused clothes pile up, your go-to outfits get buried. This makes your closet feel cramped, and leaves you feeling like you have “nothing to wear.”

3. Impulse Buying & Trends

Shopping sprees and fast fashion tempt you to keep adding pieces, even when you don’t need them.

4. Emotional Attachments

Many people hold on to clothes they “might wear someday” or items with sentimental value.

5. Poor Organization

Without smart storage solutions, even a large closet can feel tiny.

Step 1: The Slim Hanger Revolution

A close-up of slim velvet hangers holding neatly arranged shirts and dresses, maximizing closet space.

If your closet feels stuffed, your hangers might be the culprit. Here’s why switching to AmazonBasics Slim Velvet Hangers is a game-changer:

  • Space-Saving Magic: These hangers are slim yet sturdy, saving up to 50% more space compared to bulky wooden hangers.
  • No More Clothing Avalanches: Their non-slip velvet coating keeps shirts, blouses, and dresses securely in place, no more crumpled piles on the floor.
  • A Visual Upgrade:  Matching velvet hangers create a clean, organized look, like your wardrobe just got a glow-up.

I once swapped my old hangers for these velvet ones, and my closet went from chaotic to calm. Suddenly, it looked bigger, my clothes stayed put, and I felt like I was browsing a boutique instead of digging through a mess.

Step 2: Embrace the Double Rod Magic

A closet with a double rod system, efficiently holding shirts on the top rod and pants on the bottom, doubling the storage capacity.

If your closet feels cramped, a SimpleHouseware Double Rod Garment Rack is your new best friend. Here’s why:

  • Instant Space Upgrade: With two rods, you effectively double your hanging space. Use the top rod for shirts and the bottom rod for pants or skirts.
  • No More Floor Pileups: Say goodbye to jeans and hoodies cluttering the floor, everything gets its own spot.
  • Budget-Friendly Solution: The SimpleHouseware Double Rod Garment Rack costs only $35 to $40, making it an affordable fix for cramped closets.

I added one of these racks to my closet, and suddenly it felt like I’d unlocked a cheat code. Twice the space, zero mess. My closet went from chaos to calm, and my floor thanked me.

Step 3: The Power of Shelf Dividers

A closet shelf neatly divided with shelf dividers, keeping sweaters, shirts, and accessories well-organized.

Tired of those wobbly sweater towers? Shelf dividers are the fix you didn’t know you needed. Here’s why they’re a must:

  • Neat & Tidy Stacks: Shelf dividers keep your clothes upright and organized. No more sweaters tumbling down like Jenga blocks.
  • Better Visibility: Dividers create clear sections, making it easier to grab what you need without disturbing the rest.
  • Pro Tip: Roll your t-shirts instead of folding them. It saves space, prevents wrinkles, and makes it easier to spot your favorite band tee at a glance.

I swapped messy piles for shelf dividers, and my closet instantly went from “disaster zone” to “Pinterest-worthy.” Simple yet powerful.

Step 4: Go Vertical Like a Pro

 A tall closet with stacked shelves and vertical storage solutions, making full use of available space.

Your closet’s vertical space? Totally underrated. The ClosetMaid Adjustable Organizer System turns wasted air into prime storage real estate. Here’s why it’s a winner:

  • Multi-Purpose Design: With shelves, rods, and compartments, it can hold everything, from dresses to handbags to shoes.
  • Maximized Storage: By stacking items vertically, you unlock hidden storage potential without expanding your closet’s footprint.
  • Sturdy & Stylish: It’s durable, adjustable, and blends well with most closet designs.

💰 Cost: $80 to $100, but trust me, it’s worth every penny.

Step 5: Storage Boxes Are Your Friends

Stackable storage boxes neatly arranged on a closet shelf, labeled for easy access to seasonal clothes and accessories.

Storage boxes are the ultimate space-saving hack, perfect for keeping your closet neat without sacrificing your keepsakes. Here’s how they make a difference:

  • Stackable Solution: Place labeled boxes on high shelves to store seasonal items, old clothes, or sentimental stuff.
  • Clear Bins = Easy Access: Transparent bins save you from digging through endless boxes, you’ll know what’s inside at a glance.
  • Label Like a Pro: Tags like “Winter Gear,” “Holiday Decor,” or “Memories” make finding things fast and painless.

Use vacuum-sealed bags inside boxes to squeeze even more space out of your storage game.

Step 6: Hooks – The Underrated Superhero

Hooks are the unsung champions of closet organization. They create instant storage without taking up floor or shelf space.

  • Perfect for Accessories: Use hooks for bags, belts, hats, scarves, or jewelry. Each hook can clear up 3 to 5 inches of shelf or drawer space.
  • Maximize Door Space: Install hooks behind your closet door or on side walls to turn wasted space into storage gold.
  • Affordable and Versatile: A pack of sturdy adhesive hooks costs under $10, making this a budget-friendly upgrade.

Use S-hooks on your closet rod for handbags, it keeps them off the floor and in easy reach.

Step 7: Shoe Racks – Because Shoes Deserve Love Too

Your shoes deserve better than being kicked into a corner. A shoe rack keeps them organized, protected, and easy to grab.

  • Neat Rows: No more tripping over sneakers or hunting for matching pairs.
  • Space-Saving Solutions: Try vertical racks or over-the-door options for small closets.

To understand how maximizing closet space works, store rarely-worn heels or dress shoes in clear plastic boxes to keep them dust-free while saving valuable shelf space.

Step 8: Out-of-Season Storage

Storing winter coats and heavy jackets in the summer? Bad idea.

  • Vacuum-Sealed Bags: Shrink bulky items by up to 80%.
  • Label Everything: Mark bags with “Winter Gear,” “Ski Clothes,” or “Holiday Sweaters” to make retrieval easy.

Add a dryer sheet inside for that fresh laundry scent.

Step 9: Declutter Like a Boss

A before-and-after comparison of a cluttered closet transformed into a neatly organized space with fewer items.

Time for some tough love.

  • The One-Year Rule: If you haven’t worn it in 12 months, it’s likely time to donate.
  • Statistics Don’t Lie: About 70% of what we own rarely gets worn. Free that space!

If you struggle to part with clothes, turn hangers backward. After six months, whatever’s still reversed ,  donate.

Step 10: A Little Routine Saves a Lot of Space

A person tidying up their closet, refolding clothes and adjusting hangers for a consistently organized space.

Don’t let clutter creep back in.

  • 5-Minute Rule: Spend five minutes each week tidying your closet.
  • Quick Wins: Refold, rehang, and shuffle out misplaced items.

Add a small laundry basket in your closet to prevent “clothes chair” syndrome.

Consistent upkeep = a closet that stays organized without much effort.

How Maximizing Closet Space Improves Your Life

Mastering how maximizing closet space works isn’t just about clever gadgets or storage hacks, it’s about creating a sense of order that makes your life easier. With slim hangers, double rod racks, and smart storage solutions, you can transform a cluttered, chaotic space into one that’s calm, organized, and efficient. When everything has its place, you’ll find your mornings are less stressful, your outfits easier to pick, and your home feels more peaceful. A well-organized closet isn’t just about maximizing, it’s about maximizing comfort and clarity in your daily life.