What are turkey tips? These tender, juicy, bite-sized pieces of turkey breast are one of the most versatile yet underappreciated protein options for your cooking repertoire. Marinated in flavorful sauces like honey BBQ, turkey tips offer the perfect balance of convenience and taste for a variety of occasions.
Whether you’re planning a backyard barbecue or looking for a quick weeknight dinner solution, turkey tips are worth your attention. Also known as turkey tenders, these select chunks of white meat are typically cut from the turkey breast and have gained popularity in bars, lounges, and pubs across the country.
Furthermore, their smaller size means they cook faster than whole turkey pieces while holding more marinade, making them particularly appealing if you’re looking to explore new foods without investing significant time or money. Throughout this guide, you’ll discover everything about turkey tips, from different cuts and cooking methods to selection tips and creative serving ideas.
What are turkey tips, and where do they come from?
Turkey tips have become increasingly popular among both home cooks and restaurant chefs. Unlike a whole turkey roast that requires hours of preparation, these small cuts offer convenience without sacrificing flavor. Let’s dive into what exactly they are and their origin.
What part of the turkey are turkey tips?
The answer depends on which type of turkey tips you’re discussing. Traditional turkey tips are small, thin slices of white meat cut specifically from the turkey breast. However, there’s sometimes confusion because “turkey tips” can refer to different cuts depending on the context and region.
Some sources indicate that turkey tips may originate from the shoulder area of the bird, which explains what are turkey rib tips. This variation highlights the importance of knowing exactly what you’re purchasing.
When buying from butchers or specialty shops and wondering what part of the turkey are turkey tips, always ask for clarification if you’re unsure about which specific cut you’re getting. Most commonly, though, when you see “turkey tips” on a menu or in a recipe, it refers to the breast meat version.
What are turkey tips made from?
Understanding what are turkey tips made from is simple: they’re made from tender turkey breast meat, cut into small, bite-sized pieces. These chunks are often marinated in flavorful blends, such as honey BBQ, offering a sweet and tangy profile that’s perfect for grilling, roasting, or pan-searing.
- Made from lean, white turkey breast
- Perfect for fast cooking and grilling
- Popular marinades include honey BBQ and garlic herb
These minor cuts cook more quickly than traditional turkey portions. Their compact size also allows for deeper marinade absorption, resulting in juicy, flavorful bites with every serving, making them ideal for both weeknight dinners and weekend barbecues.
- Absorb marinades better than significant cuts
- Offer more intense flavor with less cooking time
- Great for skewers, salads, and wraps
Turkey tips are also favored for their versatility and health benefits. As a low-fat white meat, they suit many diets and require minimal prep. Whether you’re meal prepping or entertaining, turkey tips deliver a tasty, guilt-free protein option.
What are turkey tenderloin tips vs regular turkey tips
Though sometimes used interchangeably, there are subtle distinctions between regular turkey tips and turkey tenderloin tips. Understanding what are turkey tenderloin tips is important: they are cut explicitly from the tenderloin portion of the turkey breast. The tenderloin is a particularly tender strip of meat that runs along the underside of the breast.
Turkey tenderloins are themselves boneless, skinless pieces that have been trimmed from the turkey breast, similar to chicken tenderloins. They’re occasionally labeled as turkey medallions, turkey filets, or turkey breast tenders in stores.
In contrast, standard turkey tips can be cut from various parts of the breast. When considering what are turkey tenderloin tips, they offer premium quality as they’re 100% breast meat with no dicing, chopping, or forming involved. These specialized cuts provide approximately 1-ounce whole pieces that cook quickly and require no additional cutting, making them ideal for various menu applications.
Types of turkey tips and how to identify them
Understanding the different types of turkey tips will help you make better cooking decisions. Beyond their delicious taste, knowing how to identify various cuts ensures you get precisely what you need for your recipes.
White meat vs dark meat tips
The fundamental difference between white and dark meat comes from the bird’s anatomy. White meat includes the breast, tenders, and wings, while dark meat comes from the thighs and drumsticks, which are muscles that are used more frequently during movement.
This color variation is due to myoglobin, a protein that delivers oxygen to muscles. Darker cuts contain more myoglobin because active muscles, such as the legs, require a greater oxygen flow. That’s why legs and thighs have a richer, darker appearance.
- Legs and thighs are used more, increasing myoglobin
- Myoglobin gives dark meat its deeper color and flavor
- Dark meat retains more moisture during cooking
Nutritionally, both types of meat have value. White meat has fewer calories and less saturated fat but lacks some key micronutrients. Dark meat offers more iron and zinc, along with a juicier texture, making it more nutrient-dense and flavorful despite being slightly higher in fat.
What are turkey rib tips?
Despite the name, turkey rib tips don’t come from the ribs. They are a shoulder cut of white meat turkey, typically overlooked and sometimes discarded as scrap. However, this underappreciated cut offers tender, flavorful meat, making it a worthy alternative to more familiar poultry options.
The bone-in portion includes the entire scapula bone, giving it a rib-like feel. What sets turkey rib tips apart is their striking similarity to pork ribs in texture and taste but with far less fat. These pre-cooked, juicy white meat bites absorb seasonings well and shine in a variety of flavorful preparations.
What are turkey wing tips?
Understanding what are turkey wing tips is helpful: they are the small, pointed ends of the wings and are considered white meat. Though they contain less muscle, they’re rich in skin and connective tissue, which provide excellent flavor when cooked. Often overlooked, these bits are perfect for turning simple recipes into rich, savory dishes.
- Classified as white meat, despite its small size
- High in skin and collagen, great for flavor
- Ideal for soups, broths, or slow roasting
When simmered, wingtips release gelatin and nutrients, making them perfect for homemade stocks. They’re also a crispy, satisfying snack when oven-roasted or fried to golden perfection.
- Adds body and depth to broths
- Affordable cut with multiple uses
- Great for waste-free cooking
Turkey wing tips offer both flavor and versatility. While they may not be a primary protein source due to their limited availability of meat, their culinary value is unmatched. From nutrient-rich stocks to crispy roasted snacks, these humble cuts can elevate your kitchen game in affordable and delicious ways.
What are the two types of turkeys?
When asking what are the two types of turkeys, they are generally categorized into wild and domesticated. Wild turkeys include five main subspecies: Eastern, Osceola, Rio Grande, Merriam’s, and Gould’s, each with unique traits and regional habitats. A sixth, the Ocellated turkey, is distinct and native only to parts of Mexico, Belize, and Guatemala and is characterized by its colorful plumage and unique behaviors.
Domesticated turkeys, on the other hand, have been selectively bred for commercial meat production. These birds are significantly larger than wild turkeys and lack the survival instincts needed for life in the wild. Unlike wild turkeys, domesticated varieties are less active, unable to fly, and primarily raised in controlled farming environments.
How to cook turkey tips the right way.
Understanding what are turkey tips and mastering the perfect cooking technique starts with understanding the basics. Each method produces unique flavors while maintaining the meat’s natural juiciness. Whether you’re new to cooking or looking to refine your technique, our comprehensive guide on how to cook turkey covers everything from preparation to plating, ensuring perfect results every time.
Grilling turkey tips
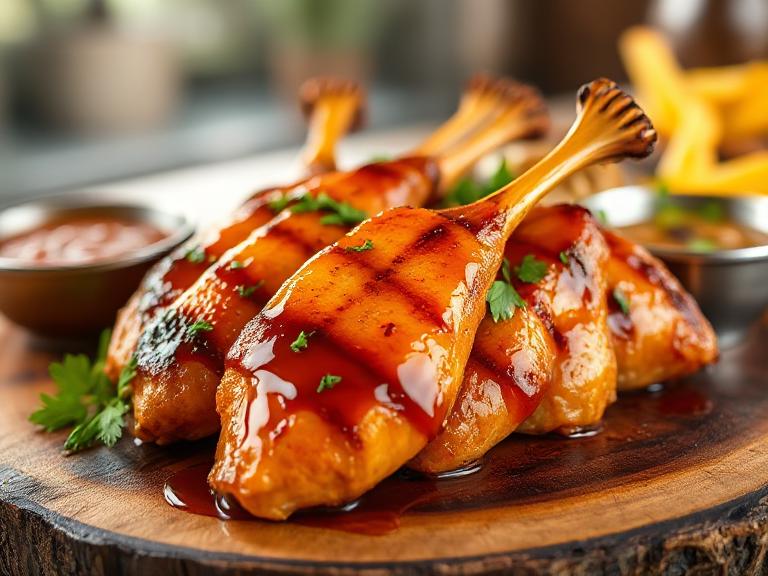
Preheat your grill to medium-high heat, about 400°F, for even cooking. Lightly oil the grates to prevent sticking, then place marinated turkey tips directly on the grill. Cook each side for 4–5 minutes or until nice grill marks appear. For those who want to master the art of outdoor cooking, our detailed BBQ turkey tips guide provides professional techniques for achieving restaurant-quality results on your gas grill.
Verify that the internal temperature reaches 165°F to ensure the food is fully cooked. In the final minute, brush the tips with reserved marinade or sauce to add a sticky, flavorful glaze. Once done, transfer them to a serving bowl and toss with extra sauce, if desired, for added moisture and flavor.
- Always use a meat thermometer to ensure food safety
- Let the meat rest for 5 minutes after grilling to retain juices
- Basting at the end prevents burning and intensifies the flavor
Grilled turkey tips are flavorful, juicy, and ideal for summer cookouts. Their small size means faster cooking time, and when paired with the right marinade, they offer a smoky, sweet, and savory bite that satisfies both health-conscious eaters and BBQ lovers alike.
BBQ Turkey Tips: Gas Grill & Oven Techniques with Marinades: Master the art of BBQ turkey with our comprehensive guide, featuring gas grill techniques, temperature control, and signature marinades that’ll make your neighbors jealous.
Oven-roasting method
To oven-roast turkey tips, preheat the oven to 350°F. Remove the tips from the marinade and arrange them in an oven-safe baking dish. For perfectly tender results with complex flavors, try our tested marinated turkey tips in the oven recipe that combines proper marinating techniques with precise oven cooking methods. Roast for 20–25 minutes, or until a thermometer inserted in the thickest part reads approximately 155°F, for proper timing.
After roasting, tent the turkey tips loosely with aluminum foil and let them rest for 10 minutes. This resting period allows the internal temperature to rise naturally to the safe minimum of 165°F, ensuring juicy, fully cooked meat that’s both flavorful and safe to eat.
Air fryer instructions
Air frying is a quick and efficient method for cooking turkey tips, delivering a crispy exterior and a juicy center. Preheat your air fryer to 400°F, arrange tips in a single layer, and cook for 4 minutes. Flip and cook for an additional 3 minutes or until the internal temperature reaches 165°F (74 °C).
- Always cook in a single layer for even crisping
- Use a meat thermometer to ensure perfect doneness
- Avoid overcrowding; cook in batches for larger portions
This method is ideal for busy weeknights or health-conscious eaters, as it uses little to no oil. Air-fried turkey tips pair well with dipping sauces or side salads, offering a flavorful, high-protein dish that’s both quick and satisfying.
7 Ways to Cook Turkey Tips: Beyond the Oven (Stovetop, Air Fryer, & More): Ready to explore more cooking methods? Discover stovetop searing, pressure cooking, and other creative techniques to transform your turkey tips into restaurant-quality meals.
Using a meat thermometer
Using a meat thermometer is the most accurate way to ensure your turkey tips are cooked safely. Insert the probe into the thickest part of the meat, steering clear of bones that may distort the reading. Always aim for 165°F, the USDA’s recommended safe minimum internal temperature for poultry.
- Insert the thermometer horizontally for thinner cuts
- Digital instant-read thermometers offer faster, more accurate results
- Clean the probe between uses to avoid cross-contamination
Always double-check.
- Check multiple spots to confirm a consistent internal temperature
- Undercooked sections may need extra cooking time
- Let the meat rest for an accurate final reading
Consistent use of a meat thermometer not only prevents undercooked or overcooked results but also improves flavor and texture. This simple step ensures food safety and enhances overall cooking confidence, which is essential when preparing lean proteins like turkey that can dry out easily if overcooked.
Common mistakes to avoid
Avoid placing cold turkey tips straight from the refrigerator into the oven or grill. Letting them sit at room temperature for about an hour promotes even cooking. Also, resist the urge to open the oven door frequently, as heat loss causes temperature fluctuations and can significantly increase your overall cooking time.
After cooking, allow the turkey tips to rest for at least 5–10 minutes before serving. This crucial step lets the juices redistribute evenly throughout the meat, resulting in a more flavorful and moist bite. Cutting too soon can cause juices to escape, leaving the turkey dry and less tender.
Buying, storing, and using turkey tips
Knowing what are turkey tips and proper selection and storage ensure both safety and flavor in your final dish. From market to table, learning how to handle these versatile cuts makes all the difference.
How to choose fresh turkey tips
Understanding what are the 2 types of turkeys (wild and domesticated) helps when choosing between fresh or frozen turkey tips, as both offer similar quality when appropriately handled. Fresh tips should be bought only 1–2 days before cooking to maintain optimal taste and safety. Always store them in the coldest part of your refrigerator until you are ready to use them.
When selecting turkey tips and wondering what are turkey rib tips, prioritize cuts with a plump, well-rounded appearance. Avoid pieces with flat or uneven spots, as these may indicate prior thawing and refreezing, which can compromise texture and moisture. High-quality turkey tips should feel firm, not mushy or overly soft to the touch.
Scrutinize the packaging before purchasing. Look for an intact, tightly sealed plastic wrap that shows no signs of tears or freezer burn. Avoid packages with excessive ice crystals or air pockets, as these can indicate improper storage. Proper packaging ensures that your turkey tips retain their flavor and moisture while also meeting food safety standards.
How long do turkey tips last in the fridge?
Raw turkey tips should be stored in the refrigerator and used within 1 to 2 days. Always place them on a tray or shallow pan to catch any drips and prevent contamination of other foods. Proper storage is essential for maintaining both freshness and food safety.
- Store raw meat at or below 40°F
- Use sealed containers or wrap tightly to prevent odor transfer
- Label with the purchase date to track freshness
Cooked turkey tips can be safely stored in the refrigerator for up to 3–4 days. Allow leftovers to cool before storing, and use airtight containers to retain moisture and flavor. Reheat thoroughly to an internal temperature of 165°F before serving.
Any turkey left at room temperature for over 2 hours should be discarded to prevent bacterial growth. This guideline is shortened to just 1 hour if the room temperature exceeds 90°F, such as during outdoor meals or in warm kitchens. Always prioritize safety to avoid foodborne illness.
Freezing and reheating tips
Raw turkey tips can be frozen for up to 9 months if properly wrapped. Use press-and-seal wrap around each piece, then store in airtight freezer bags with the air removed to prevent freezer burn and preserve flavor, texture, and food safety during long-term storage.
For safe thawing, never leave the turkey at room temperature. Instead, use one of three methods: refrigerate for 24 hours per 4–5 pounds, submerge in cold water (30 minutes per pound, changing the water every 30 minutes), or thaw using a microwave according to the manufacturer’s guidelines.
Best marinades and flavor pairings
To enhance the flavor of your turkey tips, experiment with a variety of marinades. These blends not only tenderize the meat but also infuse it with rich, mouthwatering layers of taste. For detailed marinade recipes and step-by-step instructions, our marinated turkey tips in the oven guide offers proven flavor combinations that consistently deliver exceptional results.
- Lemon-rosemary blend with olive oil and garlic
- Pineapple-based marinade with soy sauce and honey
- Sun-dried tomato with red wine and basil
Marinated Turkey Tips in the Oven: A Delicious and Easy Recipe: Put your marinating knowledge to work with our foolproof oven recipe featuring step-by-step instructions, timing tips, and flavor combinations that guarantee juicy, flavorful results.
Creative recipe ideas using turkey tips
Leftover turkey tips can be easily repurposed into flavorful dishes like tacos, stir-fries, or hearty pasta meals. Their pre-cooked versatility makes them ideal for quick weekday dinners. For more creative cooking methods and recipe variations, explore our comprehensive ‘How to Cook Turkey’ tips resource, which covers everything from basic techniques to gourmet preparations. Be sure to store leftovers properly and consume them within four days for safety and taste.
When reheating, bring turkey tips to an internal temperature of 165°F. To prevent them from drying out, add a splash of broth or water and cover them when using the oven or stovetop. This simple trick helps maintain tenderness and boosts flavor.
- Always reheat leftovers evenly to avoid cold spots
- Cut larger pieces for quicker and more even reheating
- Add fresh herbs or sauces to refresh the leftover flavor
Reinventing turkey tips not only minimizes waste but also offers meal variety without extra cooking. Try wrapping them in warm tortillas, tossing them into sautéed veggies, or stirring them into creamy pasta sauces. With a bit of creativity, your turkey tips can shine long after the first meal is served.
Nutritional Benefits and Health Considerations
When considering what are turkey tips nutritionally, they offer exceptional value, boasting high protein content, essential vitamins, and minerals. Understanding their health benefits helps justify their inclusion in balanced diets while addressing common dietary concerns and wellness goals for modern families.
Protein Content and Macronutrients
Knowing what are turkey tips made from helps explain why they provide approximately 26 grams of protein per 100-gram serving, making them excellent for muscle building and maintenance. This lean protein source contains all the essential amino acids required for optimal body function and recovery.
The macronutrient profile includes minimal carbohydrates and moderate fat content, particularly in white meat varieties. This composition makes turkey tips ideal for low-carb, keto, and high-protein dietary approaches favored by fitness enthusiasts.
Vitamins and Minerals Profile
Turkey tips are a rich source of B vitamins, particularly niacin, B6, and B12, which support energy metabolism and nervous system function. These nutrients are essential for converting food into usable energy throughout the day and for maintaining cognitive function.
- Selenium: Acts as a powerful antioxidant, protecting cells from damage and supporting thyroid function
- Phosphorus: Essential for bone health and cellular energy production in muscle and brain tissue
- Zinc: Supports immune function and wound healing processes while maintaining healthy skin
Additionally, turkey tips contain significant amounts of potassium and magnesium, which support heart health and muscle function while maintaining proper electrolyte balance throughout the body during exercise and daily activities.
Dietary Considerations and Allergens
Turkey tips naturally fit into most dietary restrictions, including gluten-free, dairy-free, and paleo-eating plans. However, individuals with poultry allergies should avoid them altogether for safety reasons and consult healthcare providers.
The low sodium content in fresh turkey tips makes them suitable for heart-healthy diets and blood pressure management. Pre-marinated varieties may contain higher sodium levels, so it’s essential to read the labels carefully if you’re monitoring your salt intake.
- Keto-friendly: Very low carbohydrate content supports ketosis and fat-burning metabolism
- Weight management: High protein promotes satiety and muscle preservation during calorie restriction
- Diabetic-friendly: Minimal impact on blood sugar levels and insulin response
Always consult a healthcare provider before making significant dietary changes, especially if you are managing chronic conditions or taking medications that affect nutrient absorption and metabolic processes throughout your body.
Cost Analysis and Budget-Friendly Tips
Understanding what are turkey tips pricing-wise helps maximize value while maintaining quality. Innovative shopping strategies can significantly reduce costs without compromising taste or nutritional benefits for budget-conscious families.
Price Comparison with Other Proteins
Turkey tips typically cost 15-20% more than chicken breast but offer superior flavor and tenderness for discerning palates. Compared to beef tips, they provide similar protein quality at approximately 30% lower cost per serving.
Seasonal pricing fluctuations occur around holidays, with the lowest prices typically found during summer months when demand decreases. Bulk purchasing during sales can reduce per-pound costs by 25-40% for savvy shoppers.
Price variations exist between fresh and frozen options, with frozen typically costing 10-15% less while maintaining comparable quality and nutritional value. Both options yield excellent cooking results when handled properly.
Money-Saving Shopping Strategies
Purchase turkey tips in family packs or bulk quantities when on sale, then portion and freeze for future use. This approach can reduce costs significantly while ensuring availability for meal planning and preparation.
- Store brand alternatives: Often 20-30% cheaper than name brands with similar quality and taste
- Seasonal sales: Stock up during post-holiday clearances and summer promotions for maximum savings
- Wholesale clubs: Bulk purchasing options for families or meal preppers seeking value
Compare unit prices rather than package prices to identify actual value and avoid marketing tricks. Sometimes, smaller packages offer better per-pound rates due to promotional pricing strategies used by retailers to move inventory.
Consider purchasing whole turkey breasts and cutting your tips when equipment and time allow. This DIY approach can save 40-50% compared to pre-cut options available in stores while providing fresher meat.
Bulk Buying and Meal Planning Benefits
Purchasing turkey tips in larger quantities allows for better meal planning and reduces the need for frequent shopping trips, ultimately saving money. Proper portioning and freezing techniques maximize freshness and minimize waste effectively for busy households.
Planning weekly menus around turkey tips enables creative recipe variations while maintaining consistent protein intake throughout the week. This approach simplifies grocery shopping and reduces decision fatigue during busy weekdays when time is limited.
Troubleshooting Common Cooking Problems
Even experienced cooks who know what are turkey tips encounter challenges when preparing them. Understanding common issues and their solutions ensures consistently delicious results every time you cook.
Preventing Dry and Overcooked Turkey Tips
Overcooking remains the most common mistake when preparing turkey tips, resulting in dry, tough meat that lacks appeal and satisfaction. Proper temperature monitoring and timing prevent this issue from ruining your meal experience.
Brining turkey tips for 2-4 hours before cooking helps retain moisture throughout the cooking process and adds flavor. This technique is particularly beneficial for lean white meat varieties that tend to dry out quickly.
Using meat thermometers ensures accurate temperature readings and prevents overcooking while maintaining food safety standards. Remove the turkey tips from the heat when they reach 160°F, as the temperature will continue to rise during the resting period.
Solving Uneven Cooking Issues
Inconsistent piece sizes lead to uneven cooking, with smaller pieces overcooking while larger ones remain undone and potentially unsafe to eat. Cutting tips to uniform sizes ensures consistent results across batches and proper food safety.
- Thickness matching: Aim for 1-inch-thick pieces for even heat penetration and consistent cooking times
- Single-layer cooking: Avoid overcrowding, which creates steam and uneven temperatures, affecting texture quality
- Rotation technique: Turn pieces halfway through cooking for uniform browning and attractive presentation
Preheating cooking surfaces properly prevents sticking and ensures immediate searing, resulting in better flavor development. Cold surfaces cause the meat to stick and cook unevenly, negatively affecting both texture and appearance while creating cleanup challenges.
Using meat thermometers in multiple pieces confirms doneness across the entire batch and ensures food safety. This extra step prevents serving undercooked portions while avoiding overcooking others completely and maintains consistent quality standards.
Fixing Bland or Under-Seasoned Results
Insufficient marinating time often results in bland turkey tips that lack flavor penetration and disappointing taste experiences. Allow a minimum of 30 minutes for basic seasoning or 2-24 hours for complex marinades to develop properly.
Salt application timing has a significant impact on flavor development throughout the cooking process and the final taste. Salting 40 minutes before cooking allows for proper seasoning absorption while maintaining the meat’s texture and moisture retention for optimal results.
- Layered seasoning: Apply salt first, then acids, followed by herbs and spices for maximum flavor
- Injection technique: Use flavor injectors for deep seasoning penetration in thick pieces
- Finishing salts: Add flaky sea salt just before serving for texture contrast and flavor enhancement
Taste-testing marinades before use ensures proper flavor balance and prevents disappointing results that waste time and ingredients. Adjust the acidity, sweetness, and spice levels to effectively complement the turkey’s mild, natural flavor profile and create a memorable dining experience.
Advanced Cooking Techniques and Professional Tips
Mastering advanced cooking methods elevates turkey tips from simple protein to restaurant-quality dishes that impress guests and family members alike.
Smoking and Low-Temperature Cooking
Smoking a turkey at 225°F for 2-3 hours yields incredibly tender, flavorful results with a deep smokiness that penetrates throughout. Use fruit woods like apple or cherry for mild, sweet flavors that complement turkey’s natural taste perfectly.
Low-temperature cooking techniques, such as sous vide, ensure precise temperature control and consistent results every time you cook. This method eliminates guesswork and produces restaurant-quality texture and flavor that impresses even the most discerning palates.
Temperature consistency remains crucial for optimal results when using advanced cooking methods and equipment. Monitor internal temperatures carefully and adjust cooking times according to the thickness and desired doneness levels to achieve consistently perfect results.
Sauce Making and Flavor Enhancement
Creating custom sauces elevates turkey tips from basic protein to gourmet dining experiences that showcase culinary skills. Pan drippings provide an excellent base flavor for gravies, reductions, and compound butter that complement the mild taste of turkey.
- Reduction sauces: Concentrate flavors by reducing wine, stock, or fruit juices with aromatics
- Compound butter: Mix herbs, citrus zest, and spices into softened butter for finishing touches
- Glaze applications: Apply during final cooking minutes for an attractive appearance and flavor layers
Deglazing cooking pans capture caramelized bits that add depth and complexity to sauces and gravies. Use wine, stock, or vinegar to lift these flavor compounds and create restaurant-quality accompaniments for your turkey tips.
Balancing sweet, sour, salty, and umami flavors creates complex taste profiles that enhance the natural characteristics of turkey. Experiment with different ingredient combinations to develop signature flavors that become family favorites and impress dinner guests.
Presentation and Plating Techniques
Visual presentation has a significant impact on dining experiences and perceived flavor quality before guests take their first bite. Proper plating techniques transform simple turkey tips into elegant, restaurant-style presentations that create lasting impressions.
Professional chefs use color contrast, height variation, and strategic garnishing to create visually appealing plates that enhance appetite and dining satisfaction. Apply these same principles to elevate your turkey tip presentations and impress family and friends.
Final Thoughts
Now that you know what are turkey tips, they certainly deserve more attention in your culinary repertoire. These tender, juicy pieces offer a perfect balance of convenience and flavor, making them ideal for both special occasions and everyday meals. Whether you choose white meat tips from the breast or explore other varieties like rib tips, you’ll find they cook faster than whole turkey pieces while absorbing marinades beautifully.
Cooking these versatile cuts can be as creative or straightforward as you desire. Grilling produces those classic charred flavors, oven-roasting ensures even cooking, and air frying delivers exceptional crispiness without sacrificing moisture. Remember to always check for the critical 165°F internal temperature using a reliable meat thermometer.
Equally important is knowing how to select quality turkey tips and store them properly. Fresh tips last only 1-2 days in the refrigerator, though freezing extends their shelf life significantly. After cooking, you can transform any leftovers into tacos, stir-fries, or pasta dishes for quick meals throughout the week.
The next time you want to try something different yet familiar, consider adding turkey tips to your shopping list. Their adaptability to various cooking methods and flavor profiles makes them a wise choice for health-conscious cooks looking to expand their protein options. From simple honey BBQ marinades to more adventurous flavor combinations, turkey tips provide the perfect canvas for culinary creativity, delivering satisfying and nutritious meals that your family will love.