Did you know that cleaning your dishwasher with vinegar can prevent your appliance from becoming a breeding ground for bacteria? According to the National Sanitation Foundation, dishwashers must reach at least 150°F to kill bacteria effectively, but this won’t happen if your machine is clogged with grime.
Over time, your dishwasher accumulates soapy residue, grease, and food particles, reducing its cleaning power. This buildup explains why you might notice plates with stuck-on crumbs and cloudy glassware after a wash cycle. Fortunately, learning how to clean a dishwasher with vinegar and baking soda provides an affordable solution, costing only $10-20 for the necessary supplies.
The best way to clean dishwasher components is with 2 cups of white vinegar and 1 cup of baking soda. With its highly acidic pH of around 2.0, vinegar effectively breaks down grease and grime, while baking soda helps eliminate odors and mineral buildup.
Setting up a regular cleaning schedule every 30 days prevents unpleasant smells and maintains your dishwasher’s efficiency. Furthermore, cleaning the filter after each use keeps your machine running smoothly. In this article, we’ll walk you through a simple 7-step process to get your dishwasher sparkling clean and working at its best again.
Step 1: Remove dishes and inspect the interior

The first crucial step when learning how to clean a dishwasher with vinegar is to empty it and thoroughly inspect its interior components before adding any cleaning agents.
(i) Check for leftover food or debris.
Begin by removing the bottom rack of your dishwasher to gain better access to the interior. This simple action reveals areas often hidden during everyday use. Next, carefully examine the bottom of the dishwasher tub for any visible food particles or debris that might have accumulated during previous wash cycles.
Food remnants trapped in your dishwasher can cause several problems. They often create unpleasant odors and, more importantly, can lead to redeposit, a technical term for when food particles get recycled back onto your dishes during wash cycles. Additionally, these food bits can eventually damage your appliance if left unaddressed.
Pay special attention to these critical areas:
- The drain area: Use paper towels or a cloth to wipe up any visible debris from the bottom of the dishwasher tub. Look for common culprits, such as glass shards, popcorn kernels, or small pieces of paper, that might be lurking there.
- Spray arms: These rotating components distribute water throughout your dishwasher. Scrutinize them for any blockages. If you notice clogged jets, clear them using toothpicks. A clogged spray arm prevents your dishwasher from spraying water effectively, resulting in dishes that are not cleaned thoroughly.
- Filter system: The filter, located at the bottom of your dishwasher, requires regular attention. Many dishwasher owners forget to clean their filters, allowing food debris to accumulate rapidly. Subsequently, this debris begins to smell and often gets recycled into the dishwasher, which sticks to your glasses and plates.
Moreover, clearing the filter and drain area is especially important since food particles extracted by the hot water jets trickle down into these components. Developing a habit of checking for leftover food after each use prevents odor and unsightly buildup. Use a paper towel to remove food bits in the well or the silverware basket.
Remember that proper drainage is essential for a clean dishwasher when checking for debris. Clogs in the filter, pump, or drain can prevent water from properly exiting the machine. Therefore, a thorough inspection of these areas is necessary before proceeding with any cleaning solution.
(ii) Look for signs of mold or odor.
Once you’ve checked for debris, the next critical step is to inspect for potential mold growth or unpleasant odors. Your dishwasher creates an ideal environment for mold, dark, hot, and damp conditions that practically invite fungal growth.
One telltale sign of a moldy dishwasher is a musty, stale, or pungent odor that persists after a wash cycle. Some dishwashers emit a rotten egg (sulfur) smell right after starting. These odors indicate it’s time for a thorough cleaning.
During your visual inspection, look specifically for:
- Discoloration and slimy residue: These are visible indicators of mold growth
- Black, green, or white patches: These typically appear around door edges, rubber seals, and dish racks
- Grime buildup in corners: Pay particular attention to areas along rubber gaskets
- Moisture that hasn’t appropriately drained: This creates perfect conditions for mold growth
Regular dishwasher maintenance ensures spotless dishes and prevents buildup that affects performance. This cleaning method, which utilizes vinegar and baking soda, yields powerful, chemical-free results. Monthly cleaning helps prevent odors and extends the lifespan of your appliance. Vinegar cuts through grease, and baking soda effectively neutralizes odors and brightens surfaces.
Proper technique matters when cleaning your dishwasher. Place white vinegar in a container on the top rack. Avoid pouring into the detergent dispenser to protect rubber components. Never run vinegar cycles with dishes loaded, as it may damage silverware. Maintain efficiency and spotless results through regular care.
While vinegar and baking soda work excellently for regular maintenance, some dishwashers require more intensive cleaning methods for stubborn odors and heavy grime buildup. If you’re dealing with persistent smells or haven’t cleaned your dishwasher in months, you might need additional techniques beyond this vinegar method. For comprehensive cleaning strategies that tackle even the toughest dishwasher problems, check out our detailed guide on How to Clean Your Dishwasher: A Step-by-Step Guide to Remove Smells & Grim.e
Step 2: Clean the dishwasher filter
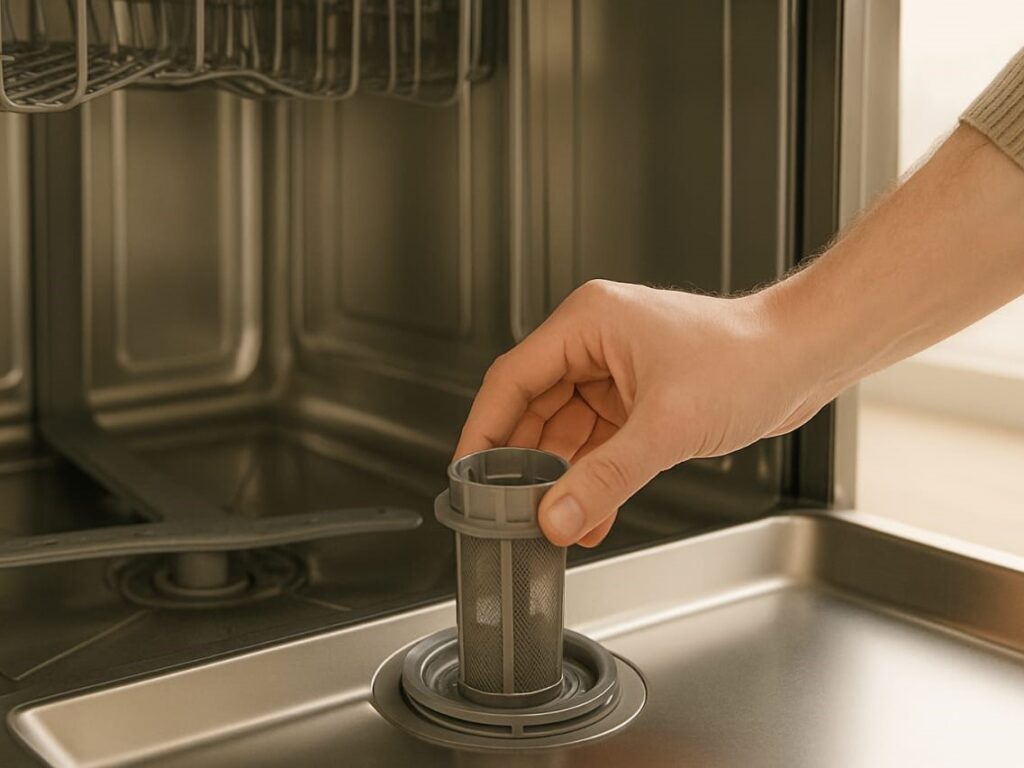
Properly maintaining your dishwasher filter is a critical step in cleaning your dishwasher with vinegar and baking soda. The filter traps food particles that would otherwise recirculate and stick to your freshly washed dishes or clog your drain.
(i) Locate and remove the filter.
Finding your dishwasher filter is straightforward once you know where to look. First, pull out the bottom rack completely to access the floor of your dishwasher. The filter is typically located in one of two places:
- At the back corner of the dishwasher tub
- Around the base of the bottom spray arm
Most modern dishwashers feature a filter system with two distinct components: an upper filter assembly (cylindrical) and a lower filter (a flat piece located beneath). However, some models may only have the upper cylindrical element, so don’t be concerned if you can’t find a lower filter.
To remove the upper filter:
- Look for arrows indicating which direction to turn (usually clockwise to unlock)
- Please give it a quarter turn in that direction
- Gently lift it upward and out
For the lower filter (if present), grasp it lightly, lift it slightly, and pull it forward to remove it completely. Handle both components carefully; a damaged filter can significantly reduce the effectiveness of your dishwasher’s cleaning.
(ii) Rinse with warm soapy water.
Once removed, your filter likely contains accumulated food particles, grease, and possibly mineral deposits. For an effective clean:
- Fill your sink or a large bowl with hot water
- Add a few drops of dish soap (preferably one containing a degreasing agent)
- Submerge the filter components completely in this solution
Let the filters soak for several minutes to loosen stubborn debris. This soaking period is significant if your filter hasn’t been cleaned in a while or shows signs of heavy buildup. The warm, soapy water helps break down grease and softens food particles that may have hardened over time.
A thorough rinse under running water removes most soils from many dishwasher filters. Nevertheless, if you notice cloudy glasses or food particles remaining on dishes after wash cycles, your filter likely needs more attention than just a quick rinse.
(iii) Scrub gently with a soft brush
After soaking, inspect your filter for any remaining debris. For a thorough clean:
- Hold the filter under warm running water
- Use a soft-bristled brush to clean both the inside and outside surfaces
- Pay special attention to the mesh screen, where particles often become trapped
- For hard-to-reach areas, an old toothbrush works exceptionally well
Necessary: Never use wire brushes, scouring pads, or abrasive cleaning tools on your dishwasher filter. These harsh materials can damage the delicate mesh and plastic components, potentially requiring costly replacement.
Apply gentle pressure with your soft brush while cleaning for stubborn calcium deposits or particularly clingy food debris. Focus on the mesh areas where particles most commonly become lodged. Occasionally, you may need to repeat the soaking process for filthy filters.
Once clean, rinse your filter thoroughly under warm water to remove any soap residue. Check that the filter no longer feels greasy and that all visible debris has been removed. A clean filter should look noticeably brighter, and the mesh should be clear of obstructions.
To reinstall the filter:
- Return the lower filter (if present) to the dishwasher tub bottom
- Position it properly under the tabs so the upper filter will align correctly
- Insert the upper filter into the opening on the lower filter
- Turn clockwise until it slides into place and locks securely
Many manufacturers recommend cleaning your dishwasher filter every two to three months. However, monthly cleaning may be necessary if you use your dishwasher frequently or if you notice any performance issues. A telltale sign that your filter needs attention is finding food particles on supposedly clean dishes after a wash cycle.
Regular filter maintenance is a crucial component in the best way to clean dishwasher systems. A clean filter ensures proper water flow throughout your appliance, allowing the vinegar and baking soda treatment (coming in later steps) to work more effectively throughout the entire machine.
(iv) Recommended Products
| Product | Description | Price | Rating | Amazon Link |
| OXO Good Grips Deep Clean Brush Set | Soft-bristled brushes are perfect for filter cleaning without damage | $15-20 | 4.5/5 | Buy on Amazon |
| Holikme 5-Pack Deep Cleaning Brush Set | Various-sized brushes, including a bottle brush for tight spaces | $12-18 | 4.3/5 | Buy on Amazon |
| Scotch-Brite Heavy Duty Scrub Sponge | Non-abrasive yet effective for stubborn buildup on filters | $8-12 | 4.4/5 | Buy on Amazon |
| Bottle Brush Set – 5 Pack | Long-handled brushes are ideal for reaching filter components | $10-15 | 4.2/5 | Buy on Amazon |
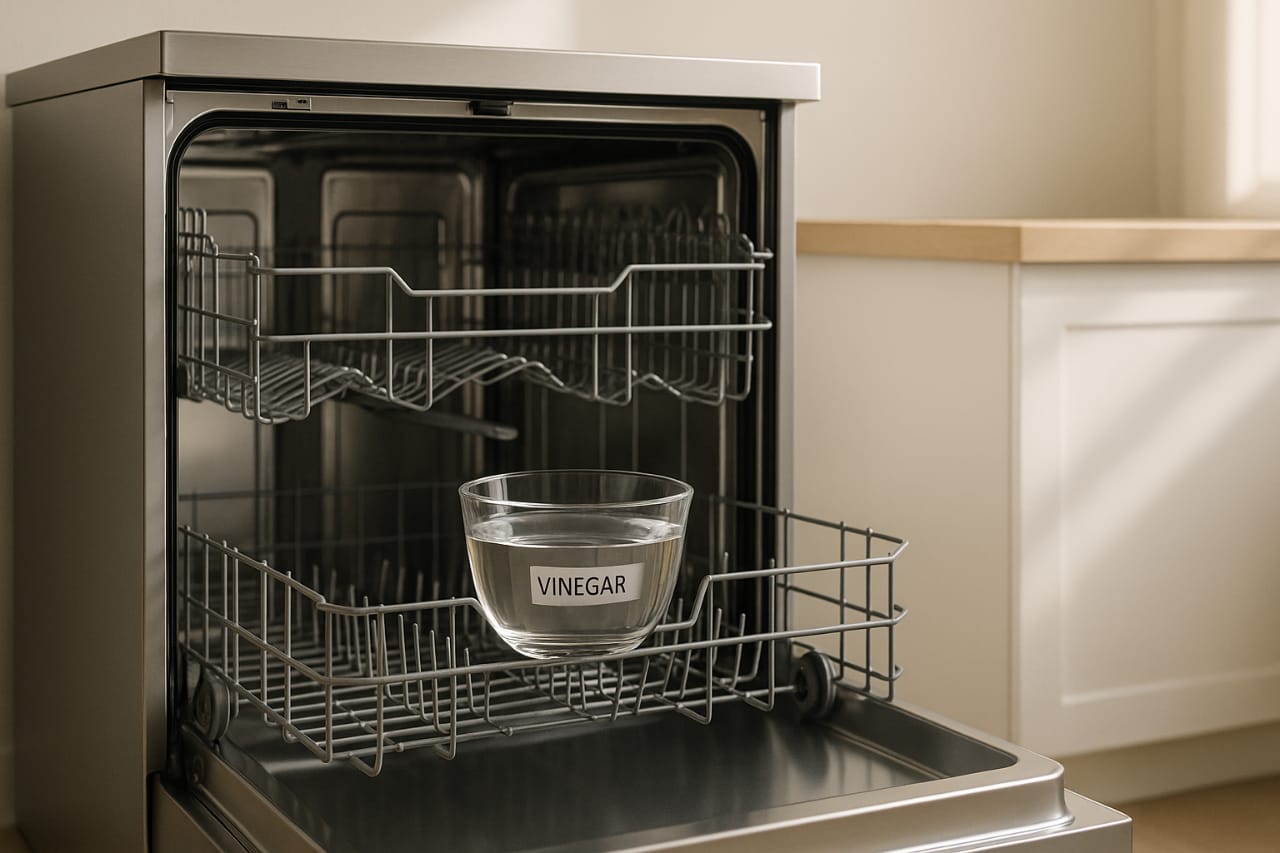
Step 3: Add white vinegar to the top rack
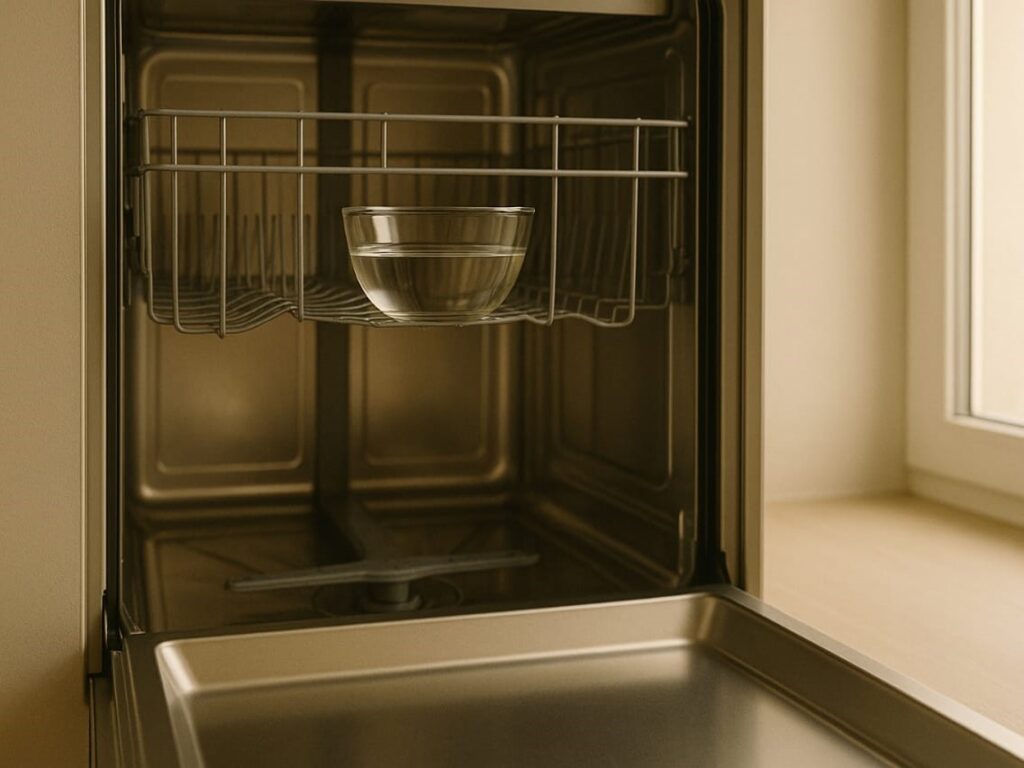
With your dishwasher empty and filter properly cleaned, it’s time to harness the power of white vinegar, your most effective ally against buildup, grease, and lingering odors. This next step forms the cornerstone of effectively cleaning a dishwasher with vinegar.
(i) Use a dishwasher-safe bowl.
First and foremost, you’ll need to select an appropriate container for your vinegar. The right vessel makes all the difference in achieving optimal results:
- Choose a dishwasher-safe bowl, cup, or mug that won’t react with the vinegar’s acidity
- Fill it with white vinegar (also called distilled vinegar)
- Place it securely on the top rack of your empty dishwasher
Expert recommendations vary slightly regarding the amount of vinegar to use. Most sources suggest using 1 cup of white vinegar. However, you can safely use up to 2 cups if your dishwasher has accumulated significant buildup or hasn’t been cleaned in a long time.
Important placement note: Although some cleaning guides suggest placing vinegar on the bottom rack, most reliable sources recommend positioning your vinegar-filled container on the top shelf. This strategic placement allows the vinegar to disperse gradually throughout the cleaning cycle rather than immediately draining away.
The container must remain upright throughout the cycle. This controlled release ensures the vinegar works effectively without potentially damaging sensitive components. White vinegar’s highly acidic pH helps dissolve mineral deposits and break down greasy residue, precisely why it’s so effective for cleaning your dishwasher.
Where to Pour Vinegar in the Dishwasher? Many people wonder where to pour vinegar in the dishwasher for optimal results. Never pour vinegar directly into the detergent dispenser; this can damage rubber seals and reduce cleaning effectiveness over time.
The best approach for pouring vinegar in the dishwasher is to use a dishwasher-safe bowl placed on the top rack. This method ensures controlled release throughout the cycle for maximum cleaning power.
(ii) Recommended Products
| Product | Description | Price | Rating | Amazon Link |
| Heinz Distilled White Vinegar (1 Gallon) | Pure 5% acidity, perfect for cleaning applications | $4-6 | 4.7/5 | Buy on Amazon |
| Great Value Distilled White Vinegar (1 Gallon) | Budget-friendly option with the same cleaning power | $3-5 | 4.6/5 | Buy on Amazon |
| Spectrum Organic White Distilled Vinegar | Organic option for those preferring natural products | $5-8 | 4.5/5 | Buy on Amazon |
| 365 by Whole Foods Market White Vinegar | High-quality distilled vinegar in convenient sizes | $3-6 | 4.6/5 | Buy on Amazon |
(iii) Run a hot water cycle without detergent.
Once your vinegar-filled container is appropriately positioned, it’s time to run your dishwasher:
- Select the hottest water setting available on your machine
- Choose a complete normal cleaning cycle
- Skip adding any dishwasher detergent; the vinegar is your cleaning agent
- Turn off the heat dry option if your machine has this setting
Hot water is crucial in this process, as higher temperatures help the vinegar dissolve mineral deposits and soap scum more effectively. The vinegar gradually disperses throughout the cycle, reaching areas that might otherwise remain untreated.
As the dishwasher runs, the vinegar accomplishes several essential cleaning functions:
- Dissolves mineral deposits that cause spots on glassware
- Removes soap scum from the dishwasher’s interior surfaces
- Breaks down grease buildup on walls and racks
- Eliminates odor-causing bacteria
- Sanitizes the interior components
This vinegar treatment tackles issues with regular detergent misses. To protect rubber seals, keep vinegar in a container, not the dispenser. After the cycle, open the door to release steam. Vinegar offers a natural, food-safe clean that’s ideal for families looking to avoid harsh chemical residues.
For best results, run the vinegar cycle monthly. Heavy use or hard water may require bi-weekly treatment. Vinegar is just one part of a complete regimen. Follow with baking soda to complement the power of vinegar and achieve a sparkling, fresh-smelling dishwasher with consistently spotless results.
(iv) White Vinegar in Dishwasher with Dishes
Never run white vinegar in the dishwasher with loaded dishes; acidic vinegar can damage silverware finishes and leave spots on glassware. Always use an empty dishwasher for cleaning cycles.
Using white vinegar in a dishwasher with dishes present may also prevent the circulation of the cleaning solution. Empty dishwashers allow vinegar to reach all surfaces effectively, ensuring thorough cleaning and sanitization.
Step 4: Sprinkle baking soda on the bottom

After completing the vinegar cycle, baking soda becomes your next powerful ally in the battle against dishwasher grime and odors. This common household ingredient is the perfect complement to vinegar due to its remarkable cleaning properties and ability to neutralize unwanted odors.
(i) Use 1 cup of baking soda.
Once the vinegar cycle has finished, open your dishwasher and remove the empty bowl you used for the vinegar. Now it’s time to apply the baking soda treatment:
- Take exactly 1 cup of baking soda.
- Sprinkle it evenly across the entire bottom surface of the dishwasher.
- Ensure it covers the whole floor area for maximum effectiveness.
Baking soda is a mild alkali that works differently from vinegar. It effectively tackles persistent residue left by food waste that vinegar may miss. Its mildly abrasive nature scrubs stains and discoloration, helping maintain a spotless, fresh-smelling dishwasher over time.
Baking soda also excels at naturally neutralizing stubborn odors. It’s fine powder reaches into small crevices that liquid cleaners might miss. It makes it an excellent, chemical-free choice for families seeking safer cleaning solutions for their dishwashers, leaving fresh dishes after each cycle.
For best results, distribute baking soda evenly across the bottom. For stubborn odors or stains, let it sit for 30–60 minutes before running the cycle. This step enhances the cleaning power of vinegar, but isn’t required for regular monthly maintenance, ensuring the dishwasher’s performance remains consistently high.
(ii) Recommended Products
| Product | Description | Price | Rating | Amazon Link |
| Arm & Hammer Pure Baking Soda (4 lb) | Premium pure sodium bicarbonate, perfect for cleaning | $6-10 | 4.8/5 | Buy on Amazon |
| Bob’s Red Mill Baking Soda (4 lb) | High-quality, aluminum-free baking soda | $8-12 | 4.7/5 | Buy on Amazon |
| Pure Organic Ingredients: Baking Soda | Eco-friendly, food-grade sodium bicarbonate | $10-15 | 4.5/5 | Buy on Amazon |
| Milliard Baking Soda (10 lb) | Bulk option for frequent cleaning, excellent value | $15-25 | 4.6/5 | Buy on Amazon |
(iii) Run a short hot cycle.
After sprinkling baking soda along the bottom of your empty dishwasher, it’s time to run another cycle:
- Close the dishwasher door securely.
- Select a short or quick cycle setting.
- Choose the hottest water temperature option available.
- Skip adding any detergent, as the baking soda serves as your cleaning agent.
- Turn off the heat dry setting if your machine has this option.
The hot water is crucial for this step because it activates the baking soda and helps distribute it throughout the interior of your dishwasher. As water circulates through your appliance, the baking soda dissolves, creating a mildly alkaline solution that effectively tackles any remaining residue.
Throughout this cycle, the baking soda works to:
- Eliminate lingering odors from the vinegar and any remaining food smells
- Remove stubborn stains that the vinegar treatment might have loosened but not completely removed
- Break down any remaining soap scum or mineral deposits
- Leave your dishwasher smelling fresh and clean
The first thing to remember is that, although both vinegar and baking soda are effective cleaning agents, they should never be used together. Always complete the vinegar cycle first, then follow with baking soda as a separate step. Using them simultaneously neutralizes their cleaning properties, making them ineffective.
Undoubtedly, one of the most significant benefits of learning how to clean a dishwasher with vinegar and baking soda is that it’s inexpensive and readily available. Once this short hot cycle is completed, your dishwasher should appear noticeably cleaner and smell fresher. Repeat baking soda treatments if stubborn stains or odors persist.
Step 5: Wipe down the door, gasket, and walls
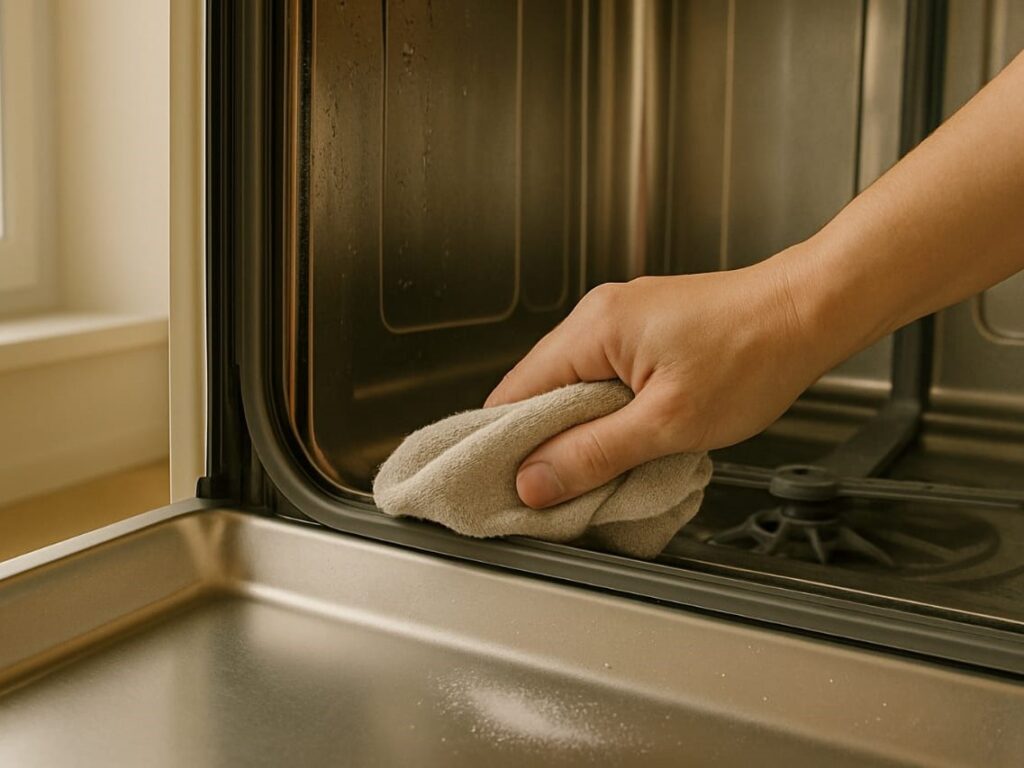
Now that you’ve utilized vinegar and baking soda cycles, your dishwasher needs manual attention to areas that automated cleaning can’t fully reach. These often-neglected spots harbor food particles, mold, and bacteria that affect cleaning performance and appliance longevity.
(i) Use a damp cloth or soapy rag.
Microfiber cloths are the ideal tool for wiping down dishwasher surfaces. These specialized cleaning cloths can absorb up to seven times their weight in water, making them exceptionally effective at lifting away grime. Additionally, they leave surfaces streak-free, which is particularly valuable for stainless steel dishwasher exteriors.
For the cleaning solution, prepare one of these options:
- Vinegar-water mixture: Mix three cups of hot water with a half-cup of vinegar
- Mild soap solution: Add a few drops of gentle dish soap to warm water
Begin with the interior of the door, as it accumulates significant splatter during wash cycles. For optimal results:
- Dampen your microfiber cloth with your chosen solution
- Wipe the entire interior door surface, paying particular attention to edges and corners
- Rinse your clothes periodically to avoid spreading grime
- Follow with a dry cloth if excess moisture remains
For stainless steel exteriors, wipe in the direction of the metal grain to prevent streaking. Plastic or painted dishwasher doors can be cleaned with the same solution used for the interior of the dishwasher.
Indeed, remember not to use fabric softener when washing microfiber cloths, as it coats the fibers and reduces their ability to absorb. Equally important, avoid using bleach or heat when cleaning clothes, as these can damage the material and reduce its effectiveness.
(ii) Pay attention to the rubber seal.
The dishwasher gasket has a rubber seal around the door and requires special attention. This component forms a critical water barrier, preventing leaks during wash cycles. Food particles easily become trapped in the gasket’s edges, potentially disrupting the seal and causing leaks.
To properly clean this crucial component:
- Inspect the entire gasket for food debris, mold, or black residue
- Gently wipe around the rubber seal using your damp microfiber cloth
- For stubborn areas, use a soft-bristled toothbrush to reach into grooves
- Clean thoroughly yet gently to avoid damaging the seal
If you discover mold or significant black residue, a vinegar solution effectively disinfects these contaminants. For persistent mold issues, carefully examine the manufacturer’s guidelines; some permit the use of all-purpose cleaners for thorough cleaning.
Throughout the cleaning process, inspect the gasket for signs of damage, such as cracks, tears, or significant wear and tear. A compromised gasket requires replacement to maintain proper dishwasher function.
Besides the door and gasket, extend your cleaning to other critical components:
- Interior walls and the bottom surface
- Utensil holder
- Detergent dispenser
- Spray arm assembly access points
After completing this manual cleaning phase, wipe all surfaces with a dry microfiber cloth to remove excess moisture. This step primarily prevents water spots and reduces humidity, which may encourage mold growth.
For optimal maintenance, establish a weekly cleaning schedule that includes wiping down the door edges and gasket. This regular attention prevents buildup that can compromise the seal’s effectiveness. Furthermore, a monthly inspection ensures the gasket remains in good condition without cracks or excessive wear.
By thoroughly cleaning these manual-access areas, you complement the vinegar and baking soda treatments, ensuring your dishwasher remains in optimal functional and hygienic condition.
Step 6: Let the dishwasher air dry
After all your cleaning efforts with vinegar and baking soda, proper drying is the final crucial step in restoring your dishwasher to optimal condition. Proper drying prevents mold growth, eliminates lingering odors, and extends the life of your appliance.
(i) Leave the door open overnight.
After completing your cleaning cycles, proper air circulation becomes essential for eliminating remaining moisture. The most effective approach is surprisingly simple:
- Open your dishwasher door approximately 2-4 inches as soon as the final cycle ends
- This small opening allows trapped moist air to escape efficiently
- Let the dishwasher remain in this position overnight or for at least 6-8 hours
Opening the door serves multiple purposes in the drying process. It releases hot, humid air, preventing condensation, mold growth, and musty odors. Some modern dishwashers, like specific Bosch models, automate this feature. Still, you can manually open the door after the cycle for similar results.
Depending on your dishwasher model, flash drying usually takes 2 to 10 minutes. Opening the door allows efficient evaporation without extra electricity. To avoid forgetting, set a phone alarm or digital assistant reminder. This final step ensures optimal results when using vinegar to clean a dishwasher.
(ii) Wipe excess moisture if needed.
You may occasionally notice excess moisture in specific areas of your dishwasher, even after proper air drying. In these instances, a quick wipe-down ensures complete drying:
When to wipe:
- If you notice water pooling at the bottom of the dishwasher
- When condensation remains on the interior walls
- If the rubber gasket still appears damp after air drying
- Before closing the dishwasher door, if you can’t leave it open overnight
Use a clean, absorbent microfiber cloth to wipe any remaining water droplets for effective moisture removal. Pay attention to corners, crevices, and the rubber door seal where moisture commonly accumulates. Proper drying is essential for maintaining lasting cleanliness and preventing the recurrence of odors or mold.
Following air drying, inspect the interior before closing your dishwasher. Check for spots needing extra attention, especially around the rubber gasket, which tends to retain moisture. Many experts recommend the air-dry cycle over the heat-dry cycle, as it’s more energy-efficient and gentler on the appliance over time.
Proper drying completes your comprehensive cleaning process. Following the method of cleaning a dishwasher with vinegar and allowing it to air dry ensures freshness and optimal performance. This final step preserves your efforts and keeps your dishwasher odor-free, ready to deliver spotless dishes with every use.
Step 7: Set a monthly cleaning schedule

Setting up a consistent schedule for cleaning your dishwasher can make the difference between an appliance that performs efficiently for years and one that frequently malfunctions. Establishing a routine maintenance plan also ensures that your vinegar and baking soda cleaning efforts are not wasted.
(i) Why regular cleaning matters
Regular dishwasher maintenance helps prevent unwanted odors and dirt from accumulating over time. Most importantly, it stops food debris and soap scum from accumulating, issues that directly affect your appliance’s cleaning ability.
Experts recommend cleaning your dishwasher monthly to maintain optimal performance. This regular attention helps prevent limescale and hard water stains from forming on interior components.
Beyond cleanliness, proper maintenance significantly extends your dishwasher’s lifespan. A well-maintained dishwasher should last well over a decade. This longevity saves substantial money on potential repairs or premature replacement.
Routine cleaning also keeps the motor seals functioning properly. These seals can deteriorate if the dishwasher is left unused for extended periods.
(ii) Adjust the frequency based on usage.
While monthly deep cleaning works for most households, consider these adjustments based on your specific situation:
- Heavy usage households: If your family runs multiple loads daily, consider bi-weekly applications of how to clean a dishwasher with vinegar and baking soda.
- Hard water areas: Homes with mineral-rich water supply may require more frequent cleaning to prevent calcium buildup.
- After each use, clean your dishwasher filter after every cycle to maintain overall cleanliness.
- Weekly minimum: Run your dishwasher at least once weekly, even with small loads, to keep motor seals functioning properly.
- Warning signs: Increase cleaning frequency if you notice unpleasant odors, standing water, grime buildup, or dishes not being properly washed.
For exceptionally stubborn dishwasher buildup, commercial cleaning tablets can supplement your routine of cleaning a dishwasher with vinegar and baking soda. These products work in conjunction with your regular maintenance schedule, without compromising the effectiveness of natural cleaners.
Ultimately, creating calendar reminders or setting a specific “dishwasher maintenance day” each month helps establish this habit. Your consistent attention ensures that your appliance continues to operate at peak efficiency.
Conclusion
Maintaining a clean dishwasher ensures spotless dishes and significantly extends the lifespan of your appliance. This guide teaches you a comprehensive 7-step process for turning your grimy dishwasher into a sparkling clean machine using vinegar and baking soda.
Vinegar breaks down grease and grime while baking soda tackles stubborn residue and eliminates odors. This powerful combination costs merely $10-20 for supplies yet delivers professional-level results without harsh chemicals. Additionally, these natural cleaners prevent mineral buildup, which often causes cloudy glassware and spotted dishes.
Food particles, soap scum, and grease accumulate over time, reducing your dishwasher’s efficiency and potentially harboring bacteria. Regular monthly cleaning helps prevent these issues before they occur. Most importantly, paying attention to often-neglected areas, such as the filter, gasket, and spray arms, ensures thorough cleaning performance.
Start implementing this simple maintenance routine today rather than waiting for unpleasant odors or poor cleaning performance to signal problems. Your dishes will emerge cleaner, your appliances will run more efficiently, and you’ll avoid costly repairs: a clean dishwasher and clean dishes are a simple equation for kitchen success.
Remember, while this vinegar cleaning method works for all dishwasher brands, some models are naturally easier to maintain than others. If your current dishwasher requires constant attention despite regular cleaning, newer models offer improved designs that stay cleaner for longer periods. Frigidaire dishwashers, in particular, are known for their user-friendly maintenance features and reliable performance. Explore our detailed Frigidaire dishwasher reviews to discover models that make kitchen cleanup truly effortless.